PTK Installation
The Rapid7 Penetration Testing Kit (PTK) enables remote penetration testing to be conducted in a variety of environments. Below you will find information on the deployment of the Rapid7 PTK into a virtual environment either by means of importing an OVA or installing via the ISO image.
Please reach out to your Project Manager if you have any additional questions during PTK installation or if your issue is not addressed in the documentation. Support hours are Monday - Friday, 8am - 5pm Pacific Standard Time.
PTK Requirements
PTK Network Requirements
Once deployed, the PTK will connect back to the PTK Network using the following for connection information. These are OUTBOUND connections and firewall exceptions may be needed to allow them:
- IP Address: 18.222.54.19
- UDP/1194
- TCP/8443
- Host: Rapid7.com (Optional: Resolves to Cloudfront addresses which are used by PTKs to periodically test HTTPS connectivity.)
- TCP/443
Additionally, it is critical that the teams responsible for networking ensure that firewalls do not block application traffic for OpenVPN or SSL/TLS to the PTK host.
Hardware Requirements
- HDD: 30 GB minimum
- RAM: 8 GB minimum
- CPU: 2x x86-64 CPUs (ARM and 32 bit processors are not supported)
Supported Virtualization Platforms
Any of these virtualization platforms can be used to run the PTK:
- VMWare ESXi/Workstation/Fusion/Player
- Oracle VirtualBox
- Ubuntu with KVM/libvirt
PTK Suggested Deployment Guide
The purpose of this document is to recommend Penetration Testing Kit (PTK) and physical Penetration Testing Kit (pPTK) deployment guidance based on your expectations of the assessment and meeting your testing goals. These are Rapid7’s PTK best practices. There may be situations where guidance should be provided by an additional party (i.e., QSA) or where it may not be possible to deploy based on restrictions.
Internal Network Penetration Test
Network Adapter Setting Considerations - NAT vs Bridged
If deploying the vPTK using a Type 2 hypervisor such as VMware Workstation or Oracle VirtualBox, please configure the vPTK network adapter in a 'Bridged' configuration. Please DO NOT deploy the vPTK with the network adapter in a 'NAT' configuration.
Deploying the vPTK in 'Bridged' mode will ensure that the vPTK receives its own IP address from the network's DHCP server, that it can communicate directly with other devices on the same network as the host, and that other machines on the network can access the vPTK directly. This configuration optimally ensures proper communication between the vPTK and in-scope assets.
Deploying a vPTK in 'NAT' networking mode results in the host creating a virtual network for the vPTK and placing it on a separate subnet. This can induce unexpected behavior; dropping of traffic during heavy scanning operations due to filling of the hypervisor's NAT translation table; and an inability to properly route traffic from in-scope assets to the vPTK without configuring port forwarding on the hypervisor.
Standard Internal Network Penetration Test:
For an internal network penetration assessment, we recommend that the PTK deployment is guided by the following suggestions:
Simulate the PTK deployment as if the consultants were on-site for the internal network assessment. For example, if you would typically place a visiting consultant on a corporate office network, please consider deploying the PTK on that same office network and virtual LAN (VLAN).
If you have multiple office networks for consideration, you may prefer a user network that generates active network traffic, such as a corporate IT network rather than a conference room network that may be segmented from other user networks. The higher traffic “user” network segments will provide for a more comprehensive “real world” testing environment.
Network Segmentation Test:
Please use guidance from your QSA for where to deploy a PTK on your internal network. Deploying a PTK outside of your Cardholder Data Environment (CDE) network segment is the most standard approach.
Internal Network Vulnerability Assessment:
You will need to deploy a PTK on an internal network to provide Rapid7 access to the internal assets for testing. Additionally, we will provide you with a Nexpose Open Virtualization Appliance (OVA) image to deploy as a Virtual Machine (VM). The PTK and Nexpose VM should both be deployed on the same network.
Wireless Network Penetration Test
Physical Placement
We recommend deploying the pPTK where the most coverage of your wireless network(s) will be available.
Additionally, you may need to coordinate with the testing consultants during the assessment to move the pPTK between physical locations for better wireless coverage, such as between an office floor to the building lobby.
Internal Application Testing and Miscellaneous Items
Internal Application Testing:
For internal application testing, please deploy the PTK on the same network and VLAN as the application to ensure that there will be no accessibility issues.
Platform Installation Instructions
OVA Deployment (preferred)
The OVA file is a virtual appliance which contains files used to describe a Virtual Machine. This can be directly imported into your virtualization software, and will automatically be configured with the appropriate minimum requirements.
VMWare ESXi Installation
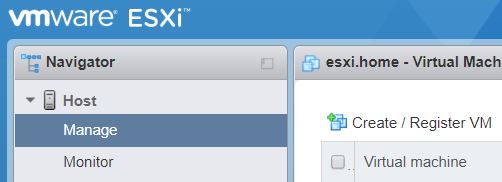
Within VMware ESXi, select "Create/Register VM", as shown below:
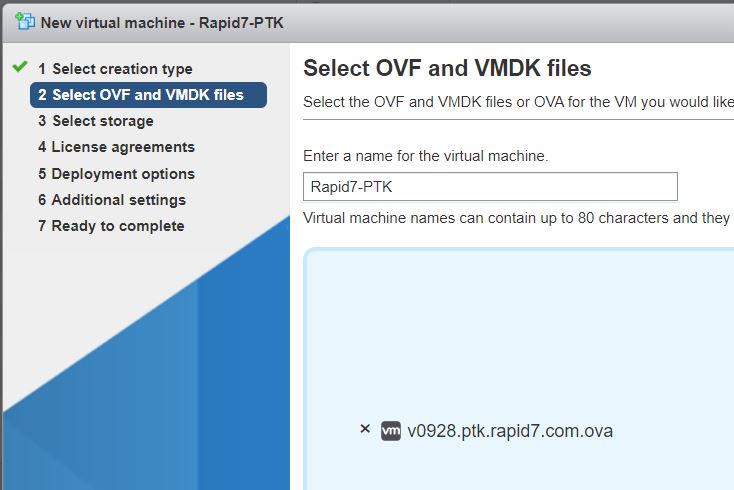
Next, name the PTK to be easily identifiable and select the OVA image by either clicking to select the file or dragging and dropping the OVA:
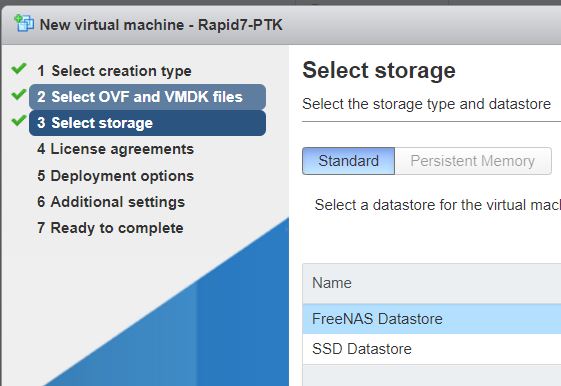
Select the appropriate datastore that the PTK will reside on. This will be specific to your infrastructure:
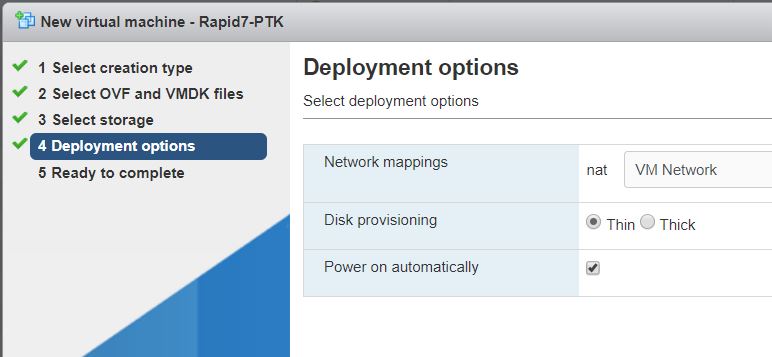
Select the appropriate virtual switch which the PTK will communicate:
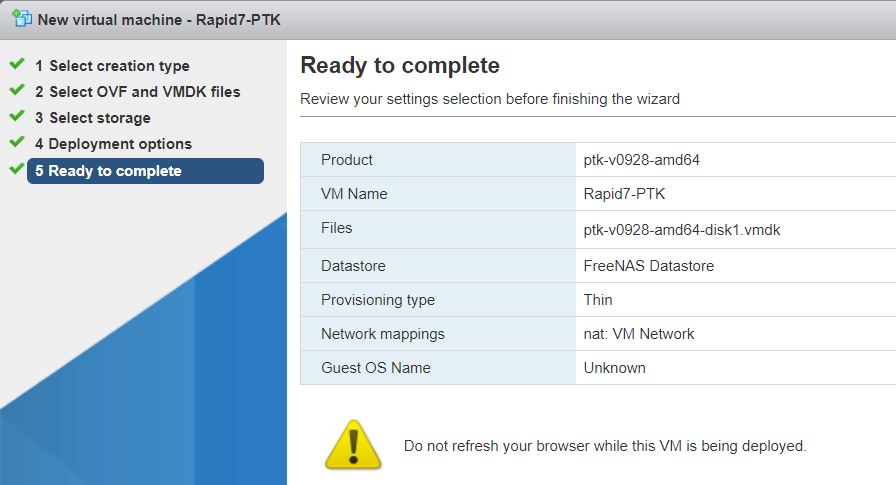
Click next and review the information. Once complete, click finish:
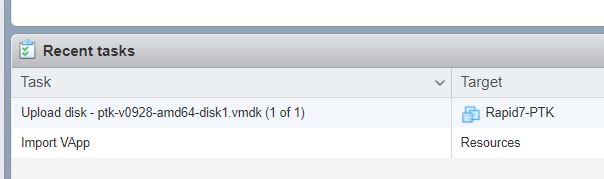
The OVA image will now be imported. This may take some time:
Once the OVA image has been imported, the Virtual Machine will automatically power itself on. If the PTK is correctly dialing back, the console should show "Success" in green, on "Intranet", "DNS", and "VPN". If it is red on any of the status indicators, please see the Status Page Errors page
VirtualBox OVA Import
-
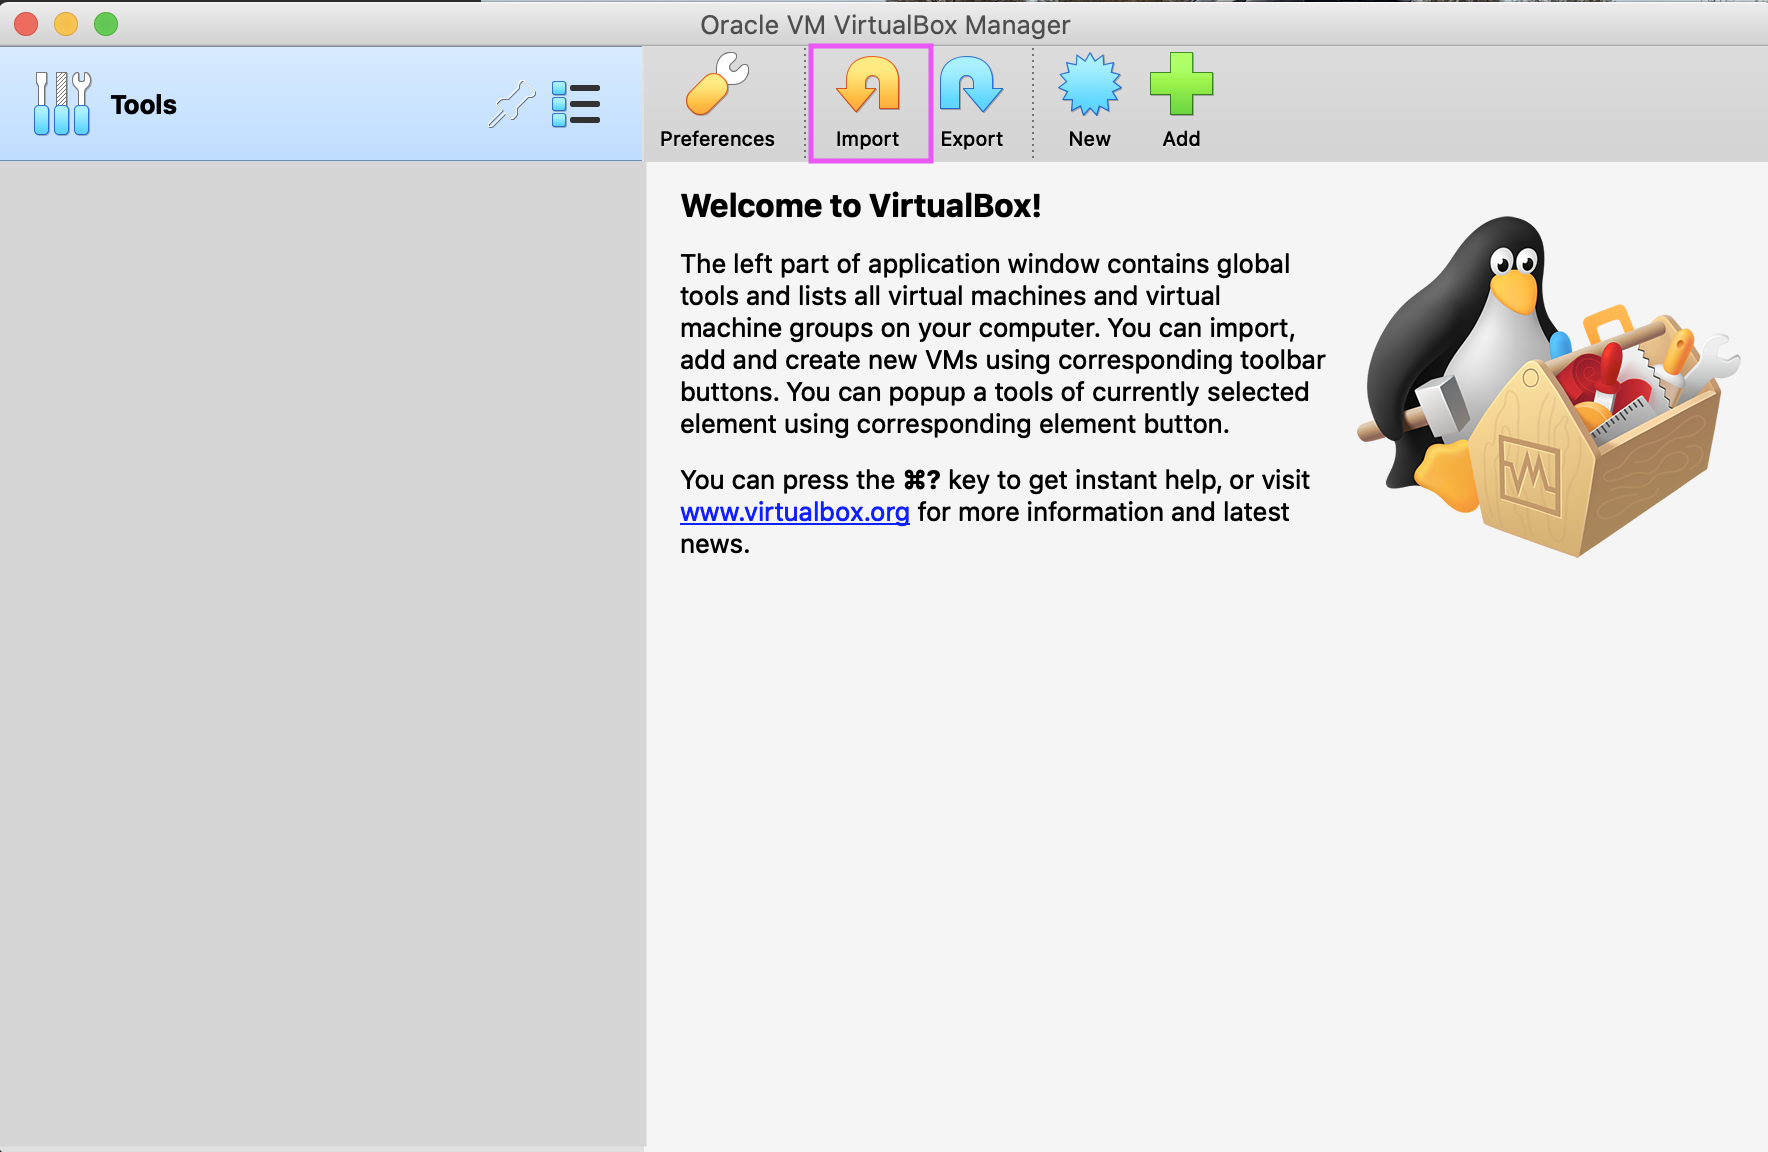
After downloading the OVA, launch VirtualBox and click Import.
-
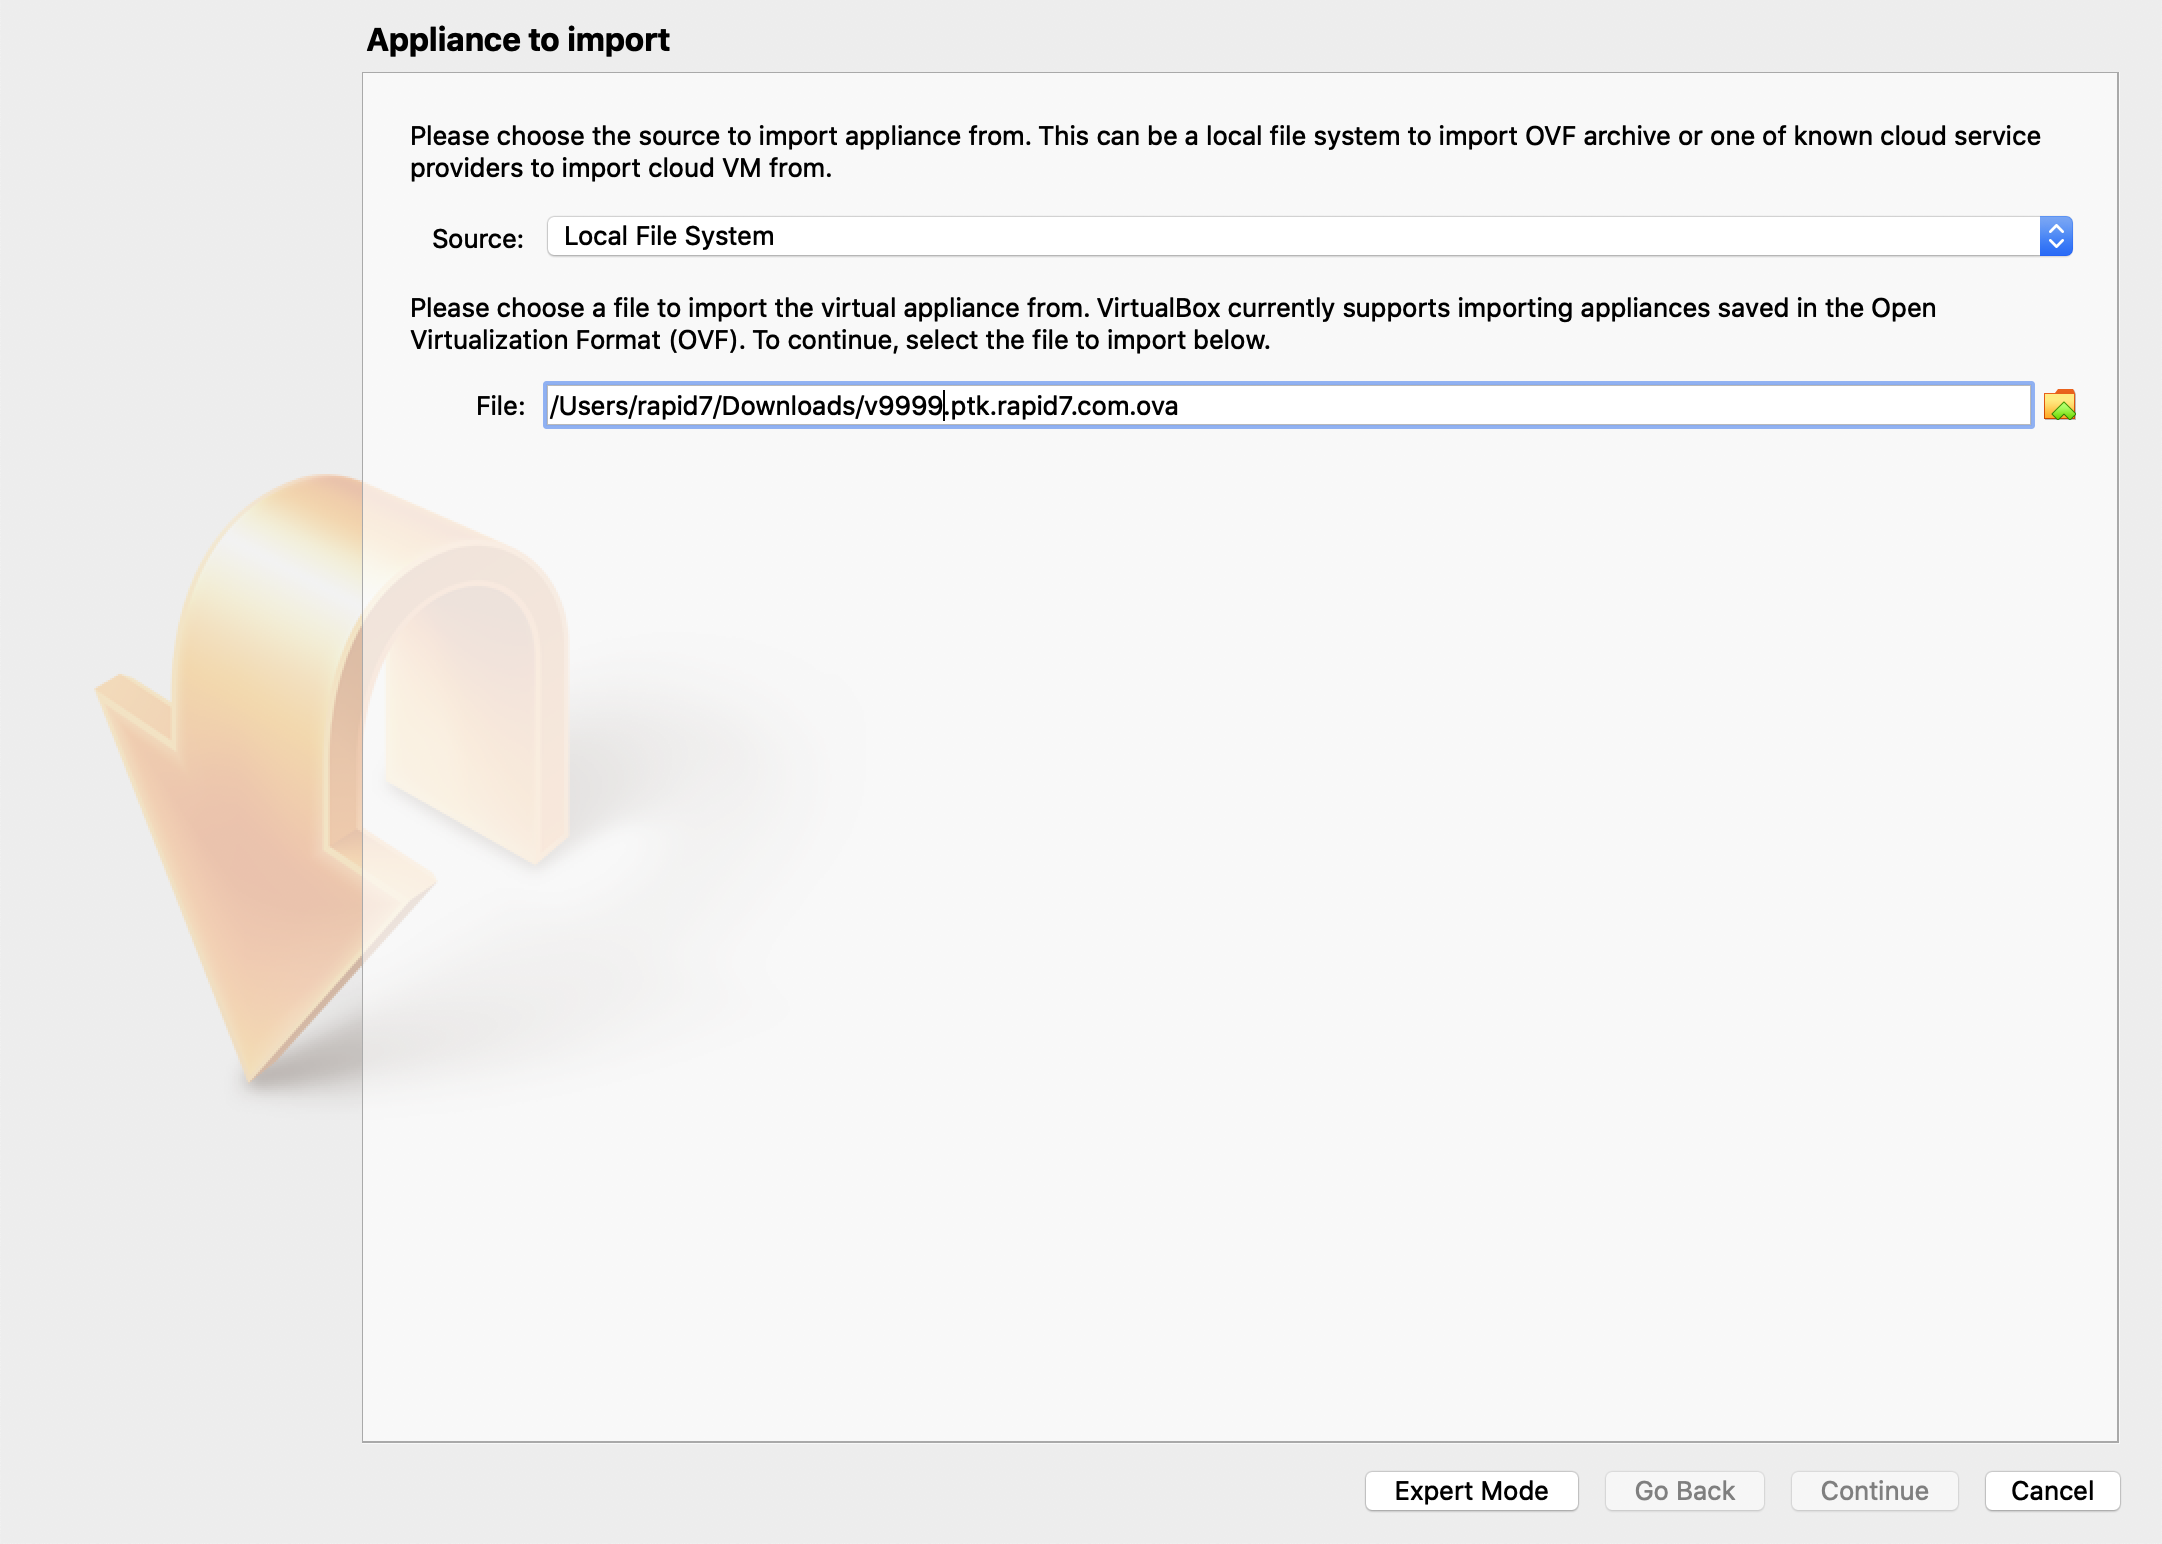
Click the file icon button, and browse to the OVA file. Click Continue.
-
Optionally, specify a Name on the Appliance settings screen. Click Import.

-
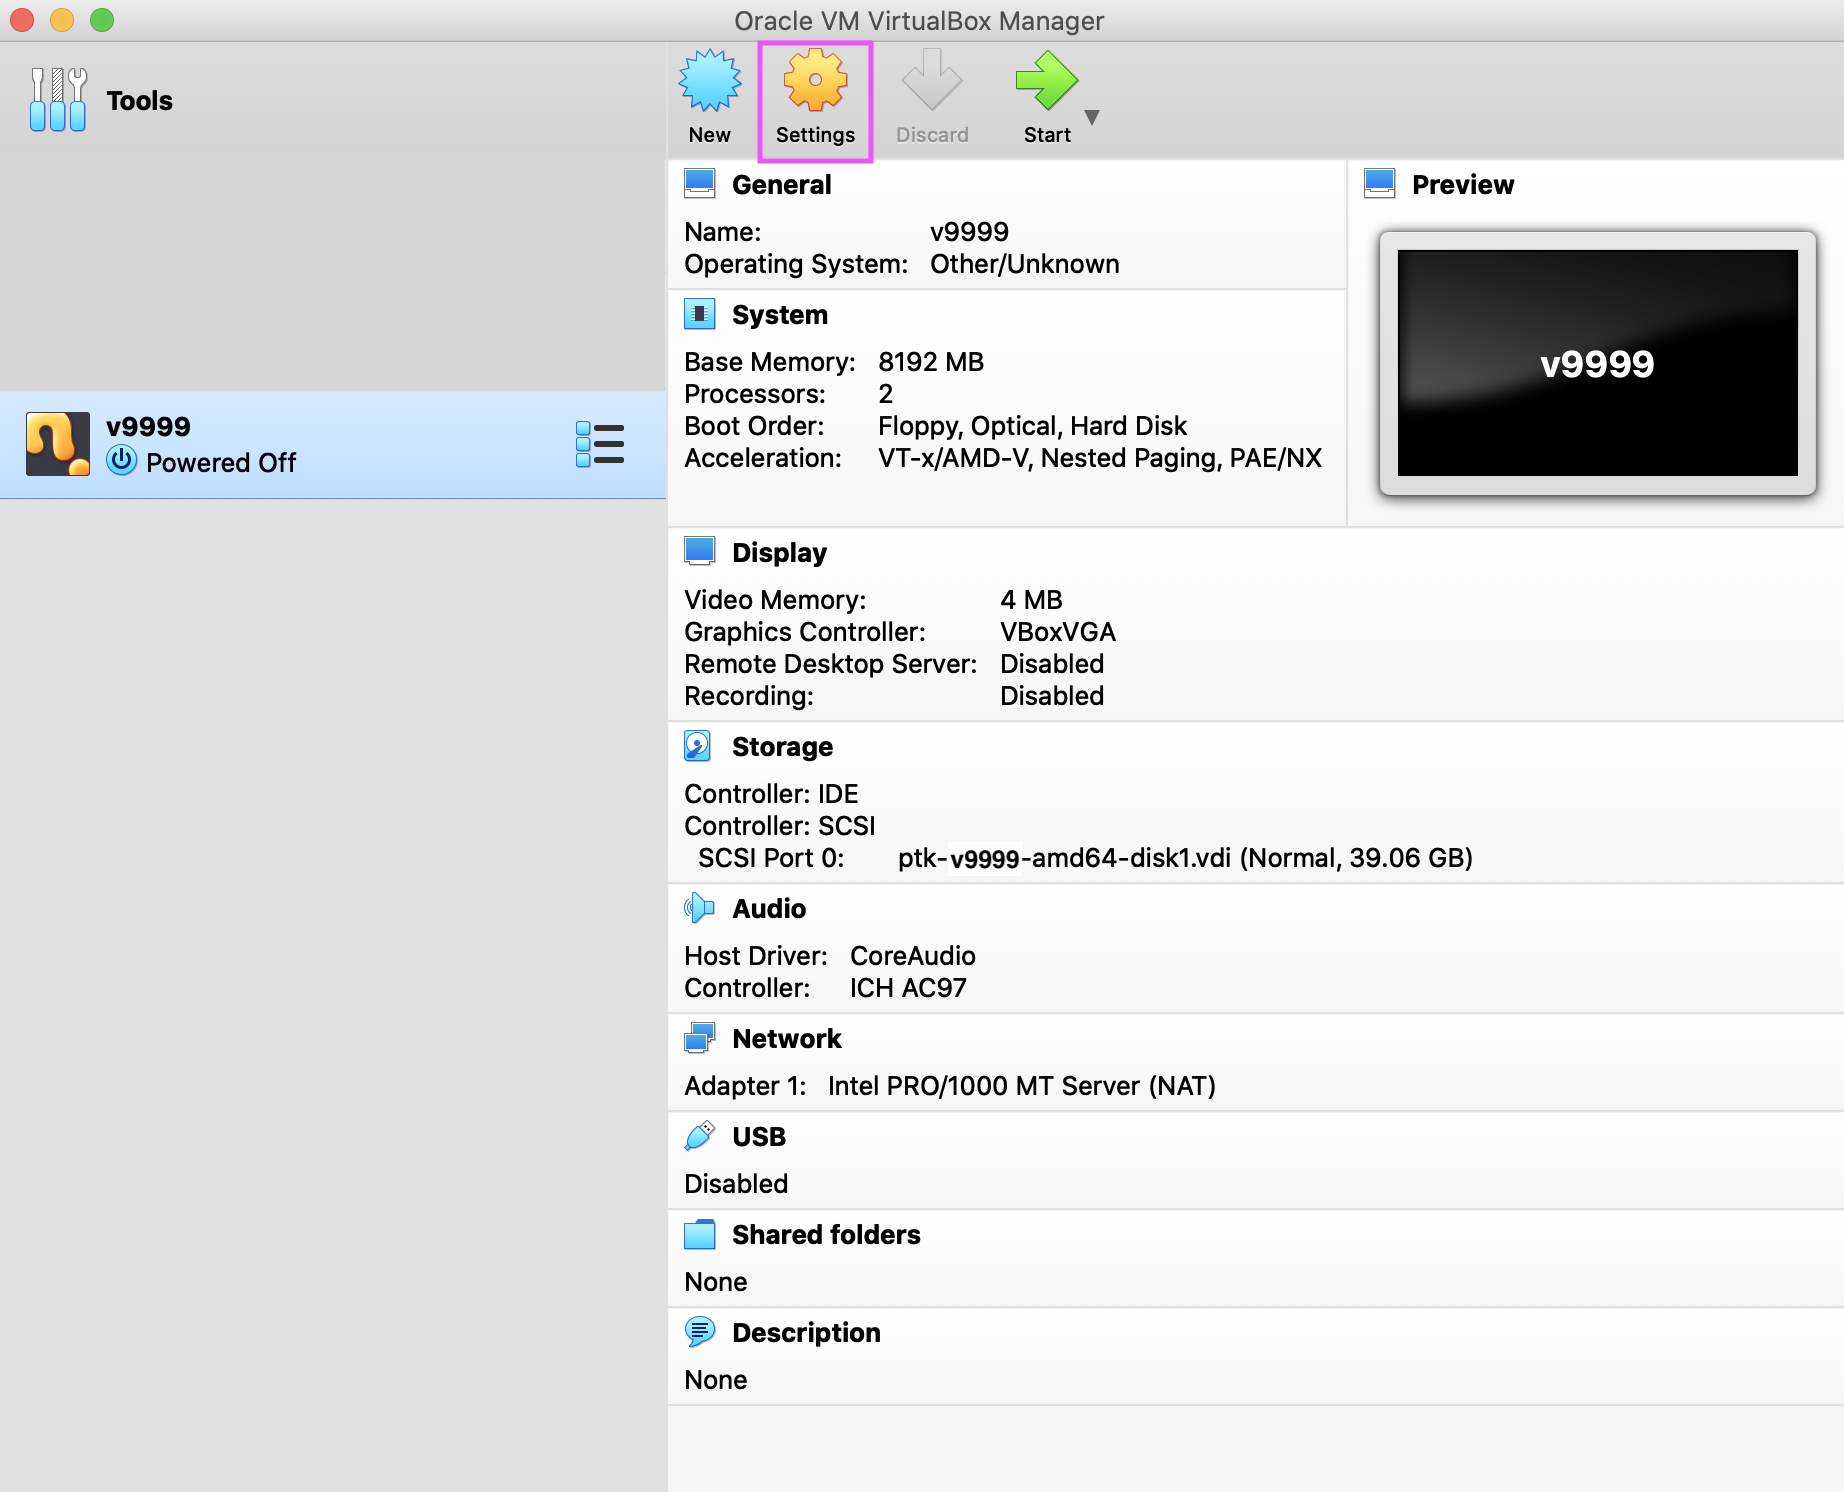
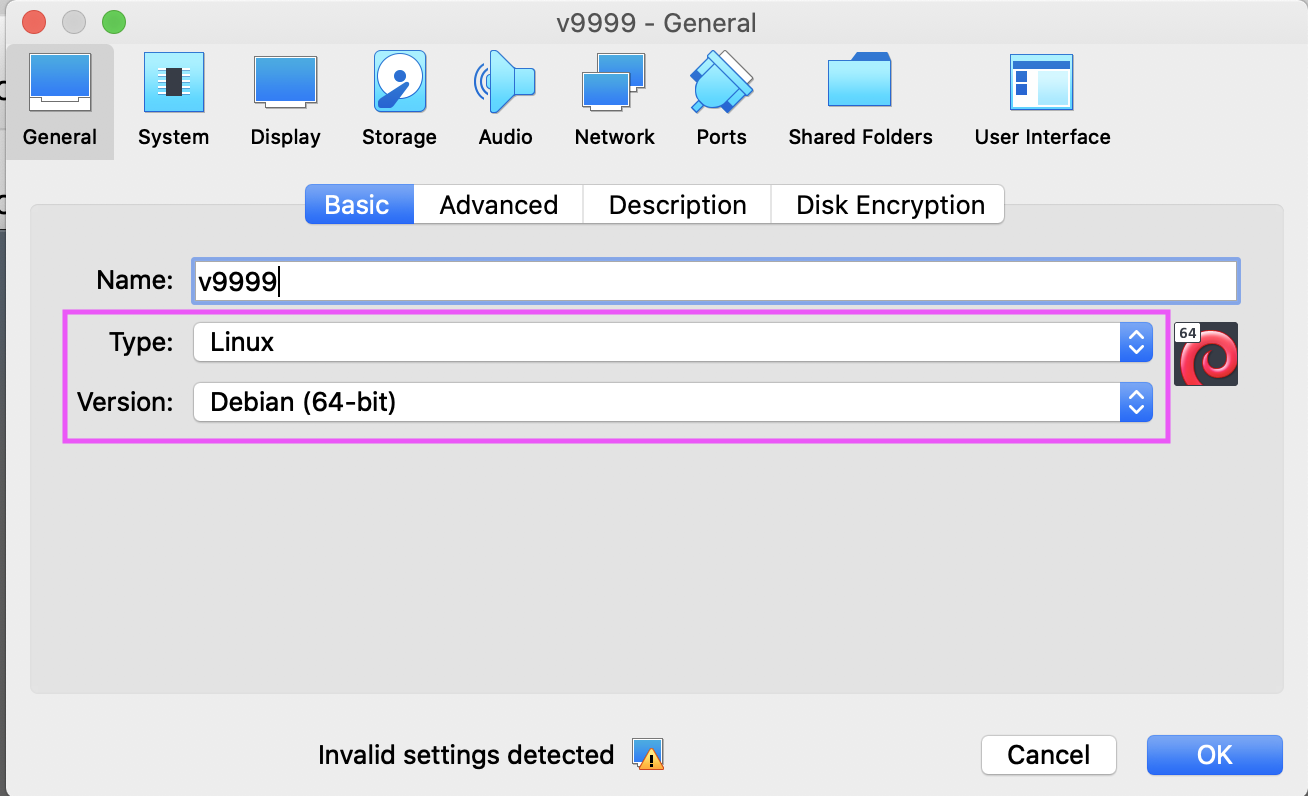
After the wizard closes, choose the VM in the list, and click Settings.
-
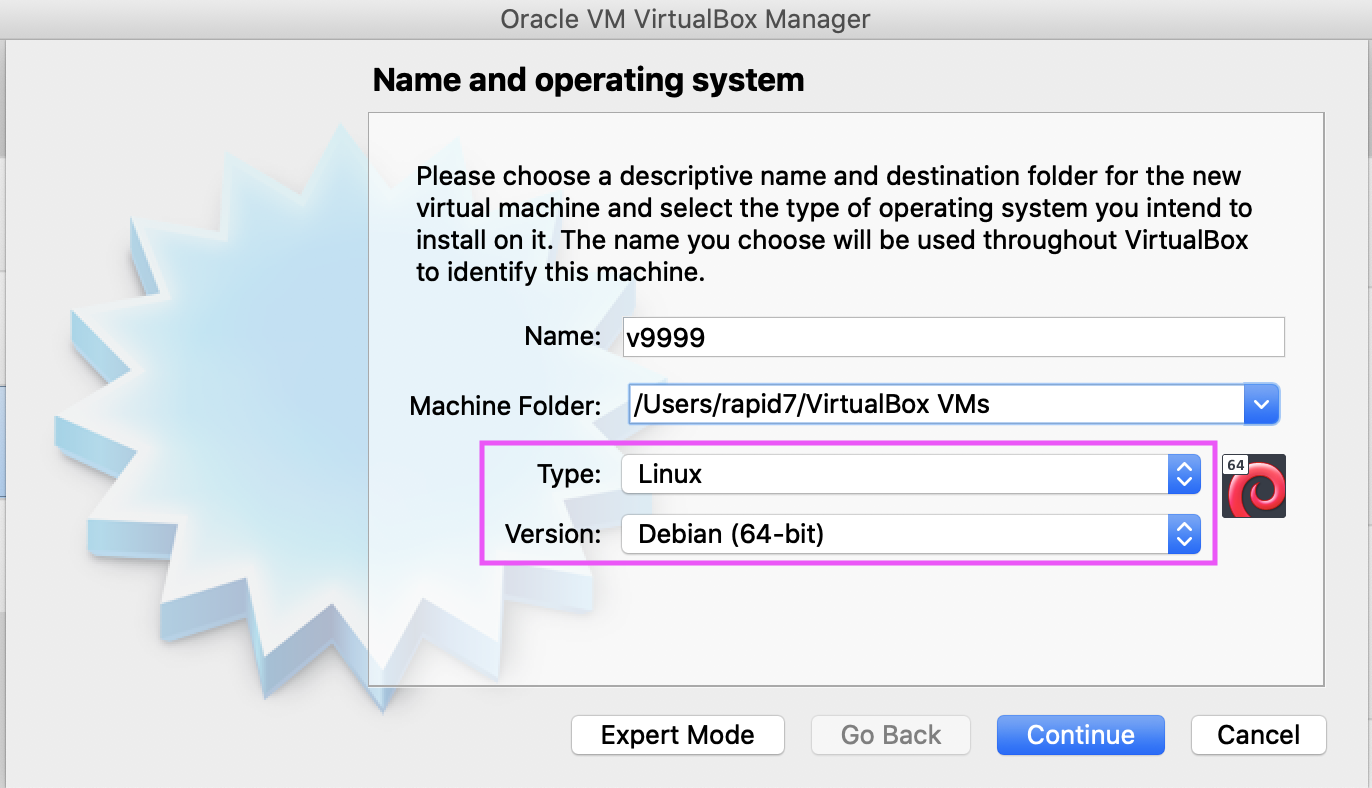
Choose General > Basic. Choose Type: Linux and Version: Debian (64-bit).
-
Choose Network > Adapter 1. Select the Bridged Adapter:

-
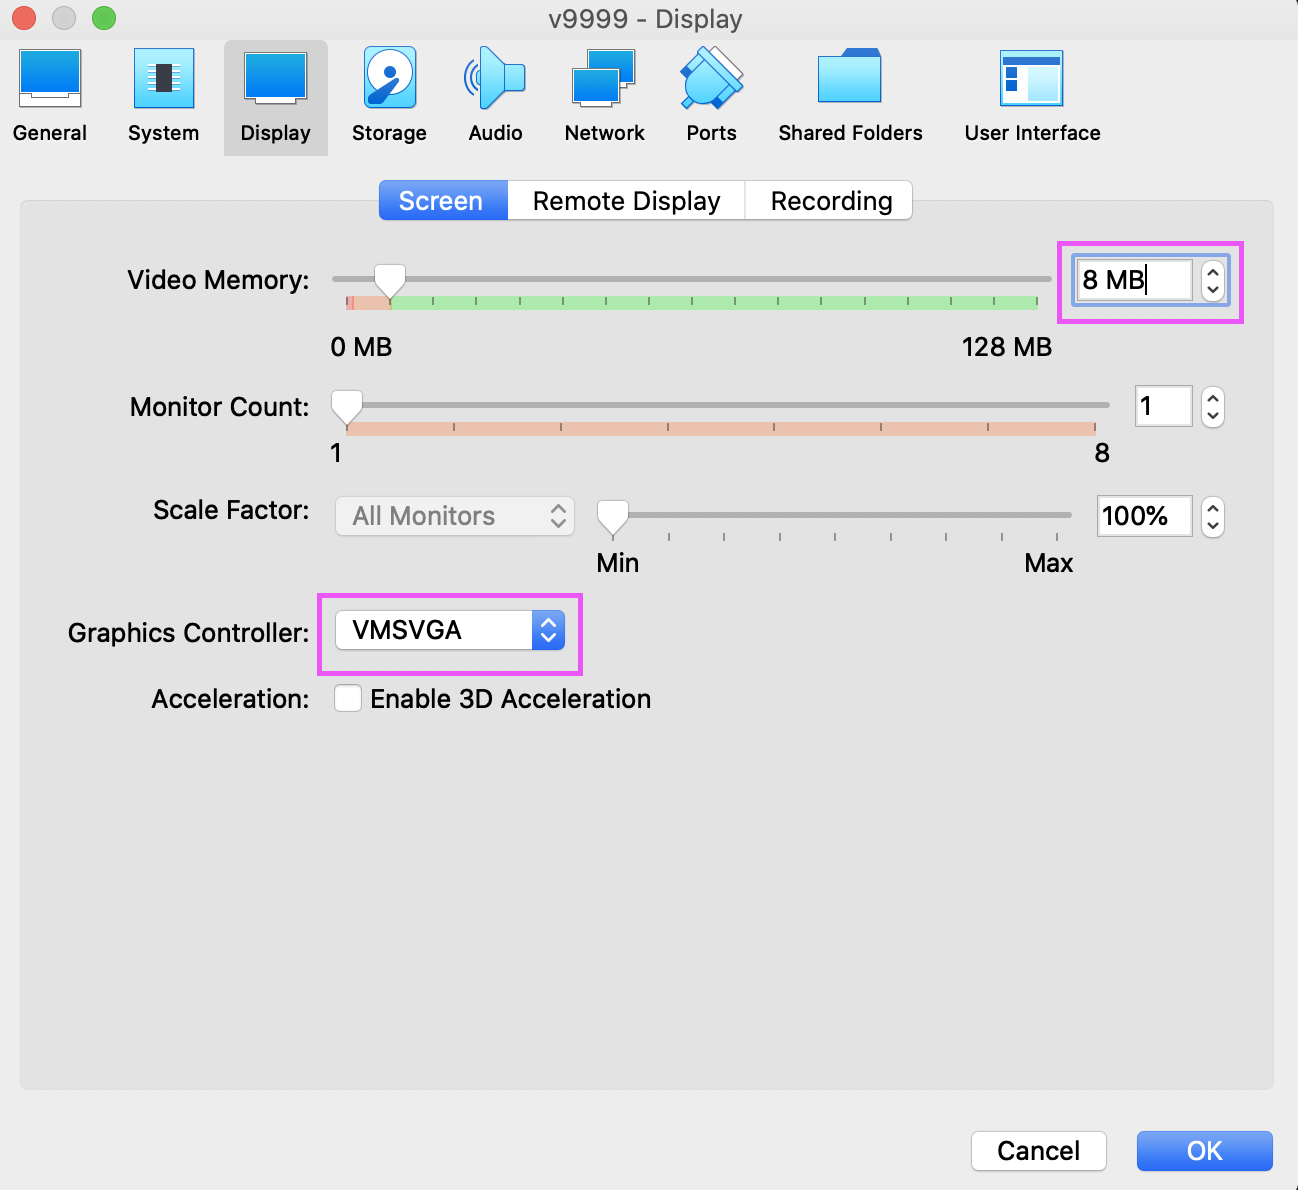
Choose Display > Screen. Set the Video Memory to 8 MB. Choose Graphics Controller: VMSVGA. Click OK.
-
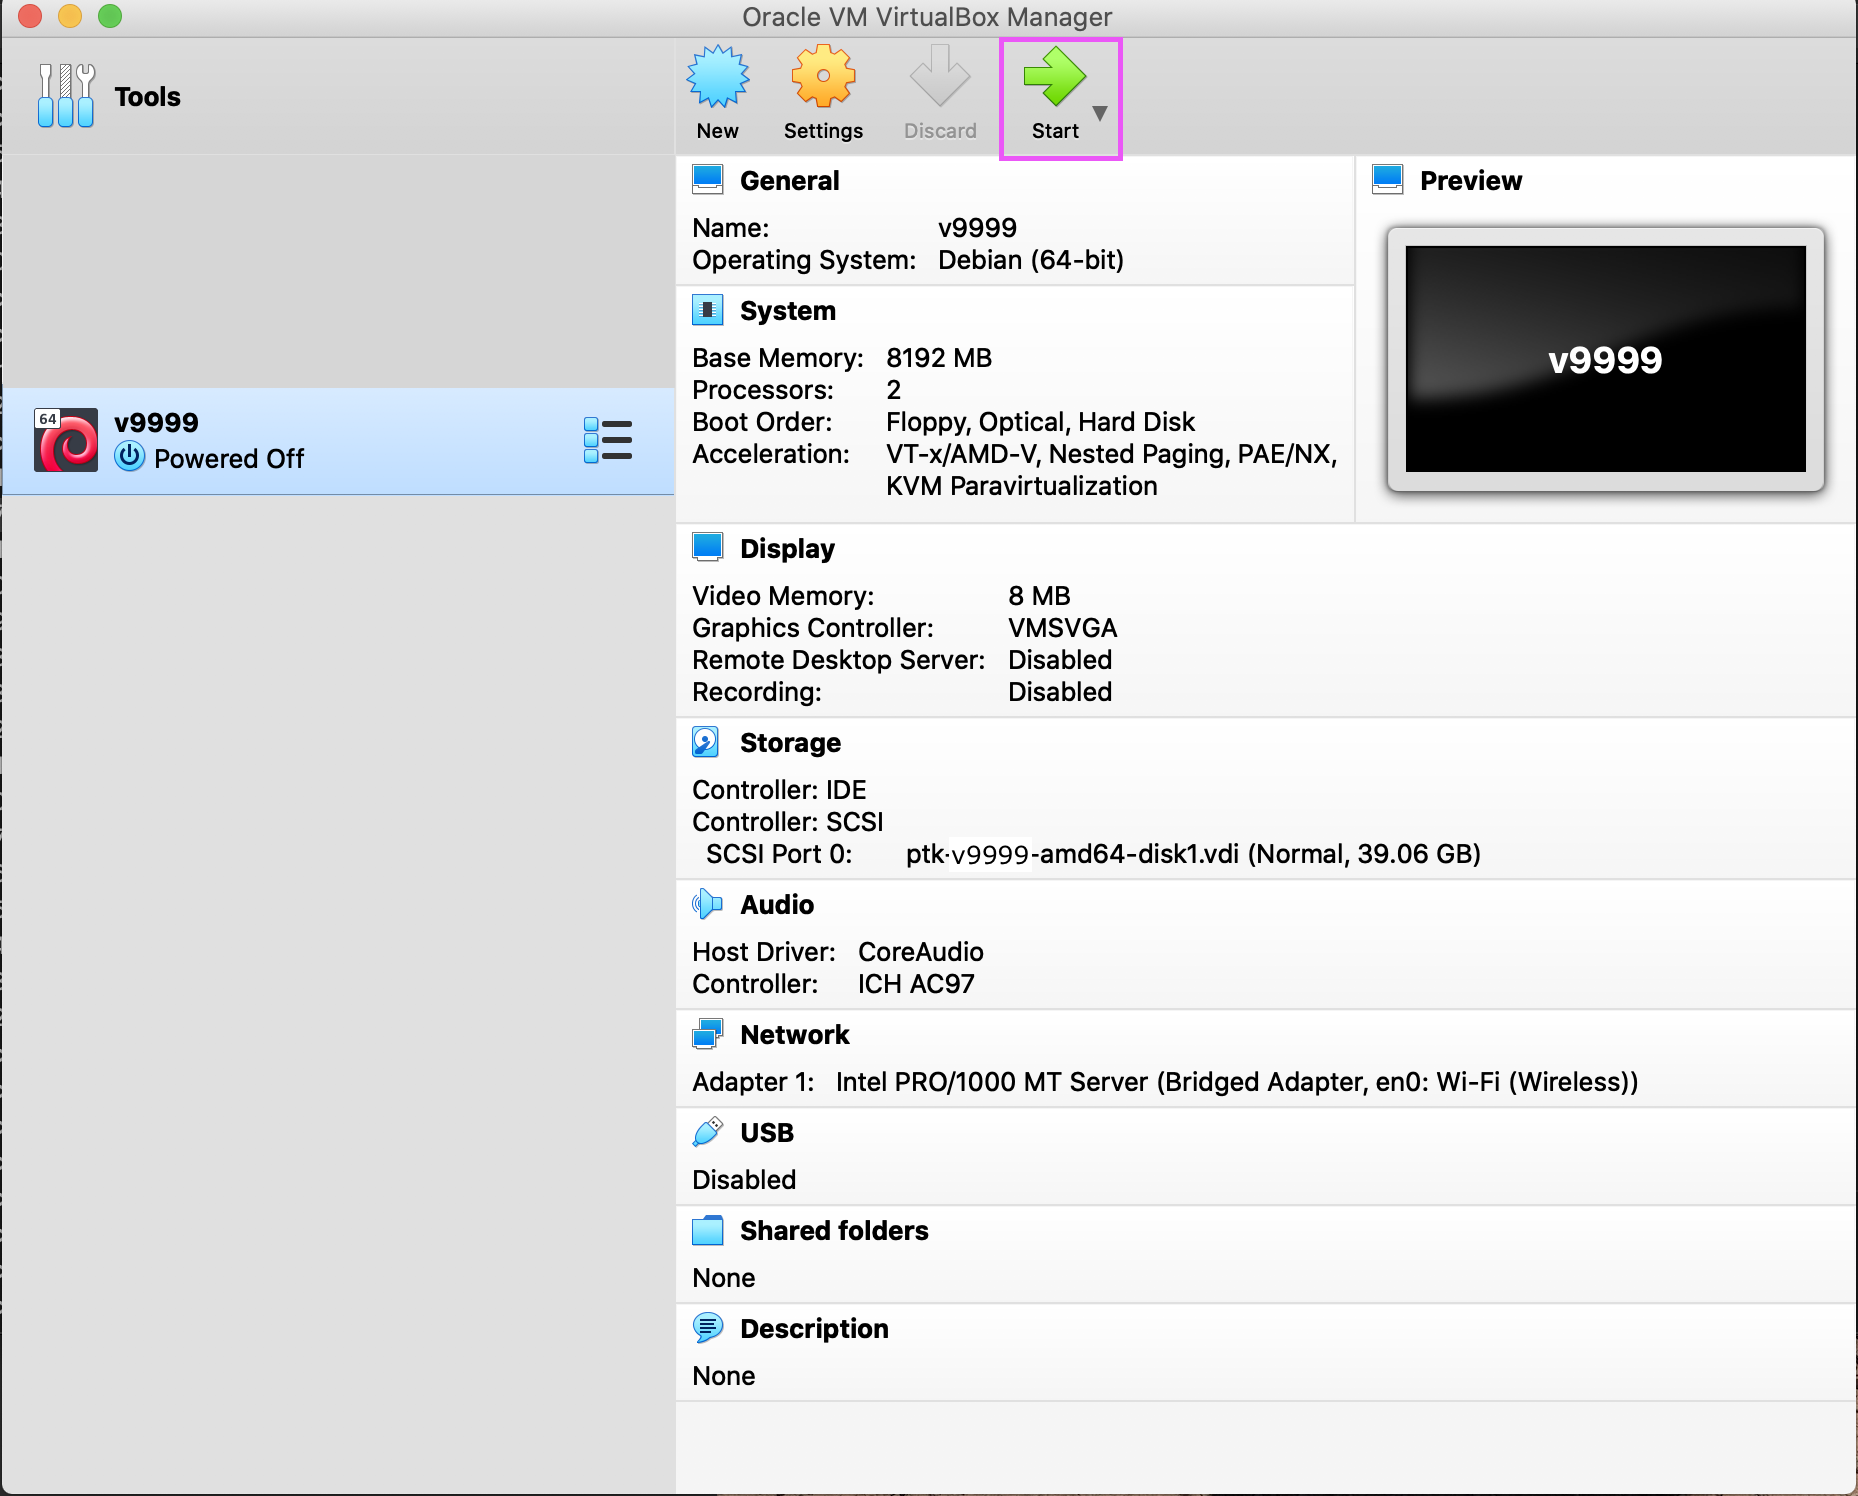
Click Start. The VM should power on and begin connecting back to our OpenVPN server.
ISO Installation
The ISO file is a disk image format that a Virtual Machine can boot from as though it was booting from a physical disk. The ISO contains all installation media required to deploy a PTK, but requires the manual configuration of the VM's virtual hardware according to our minimum hardware requirements.
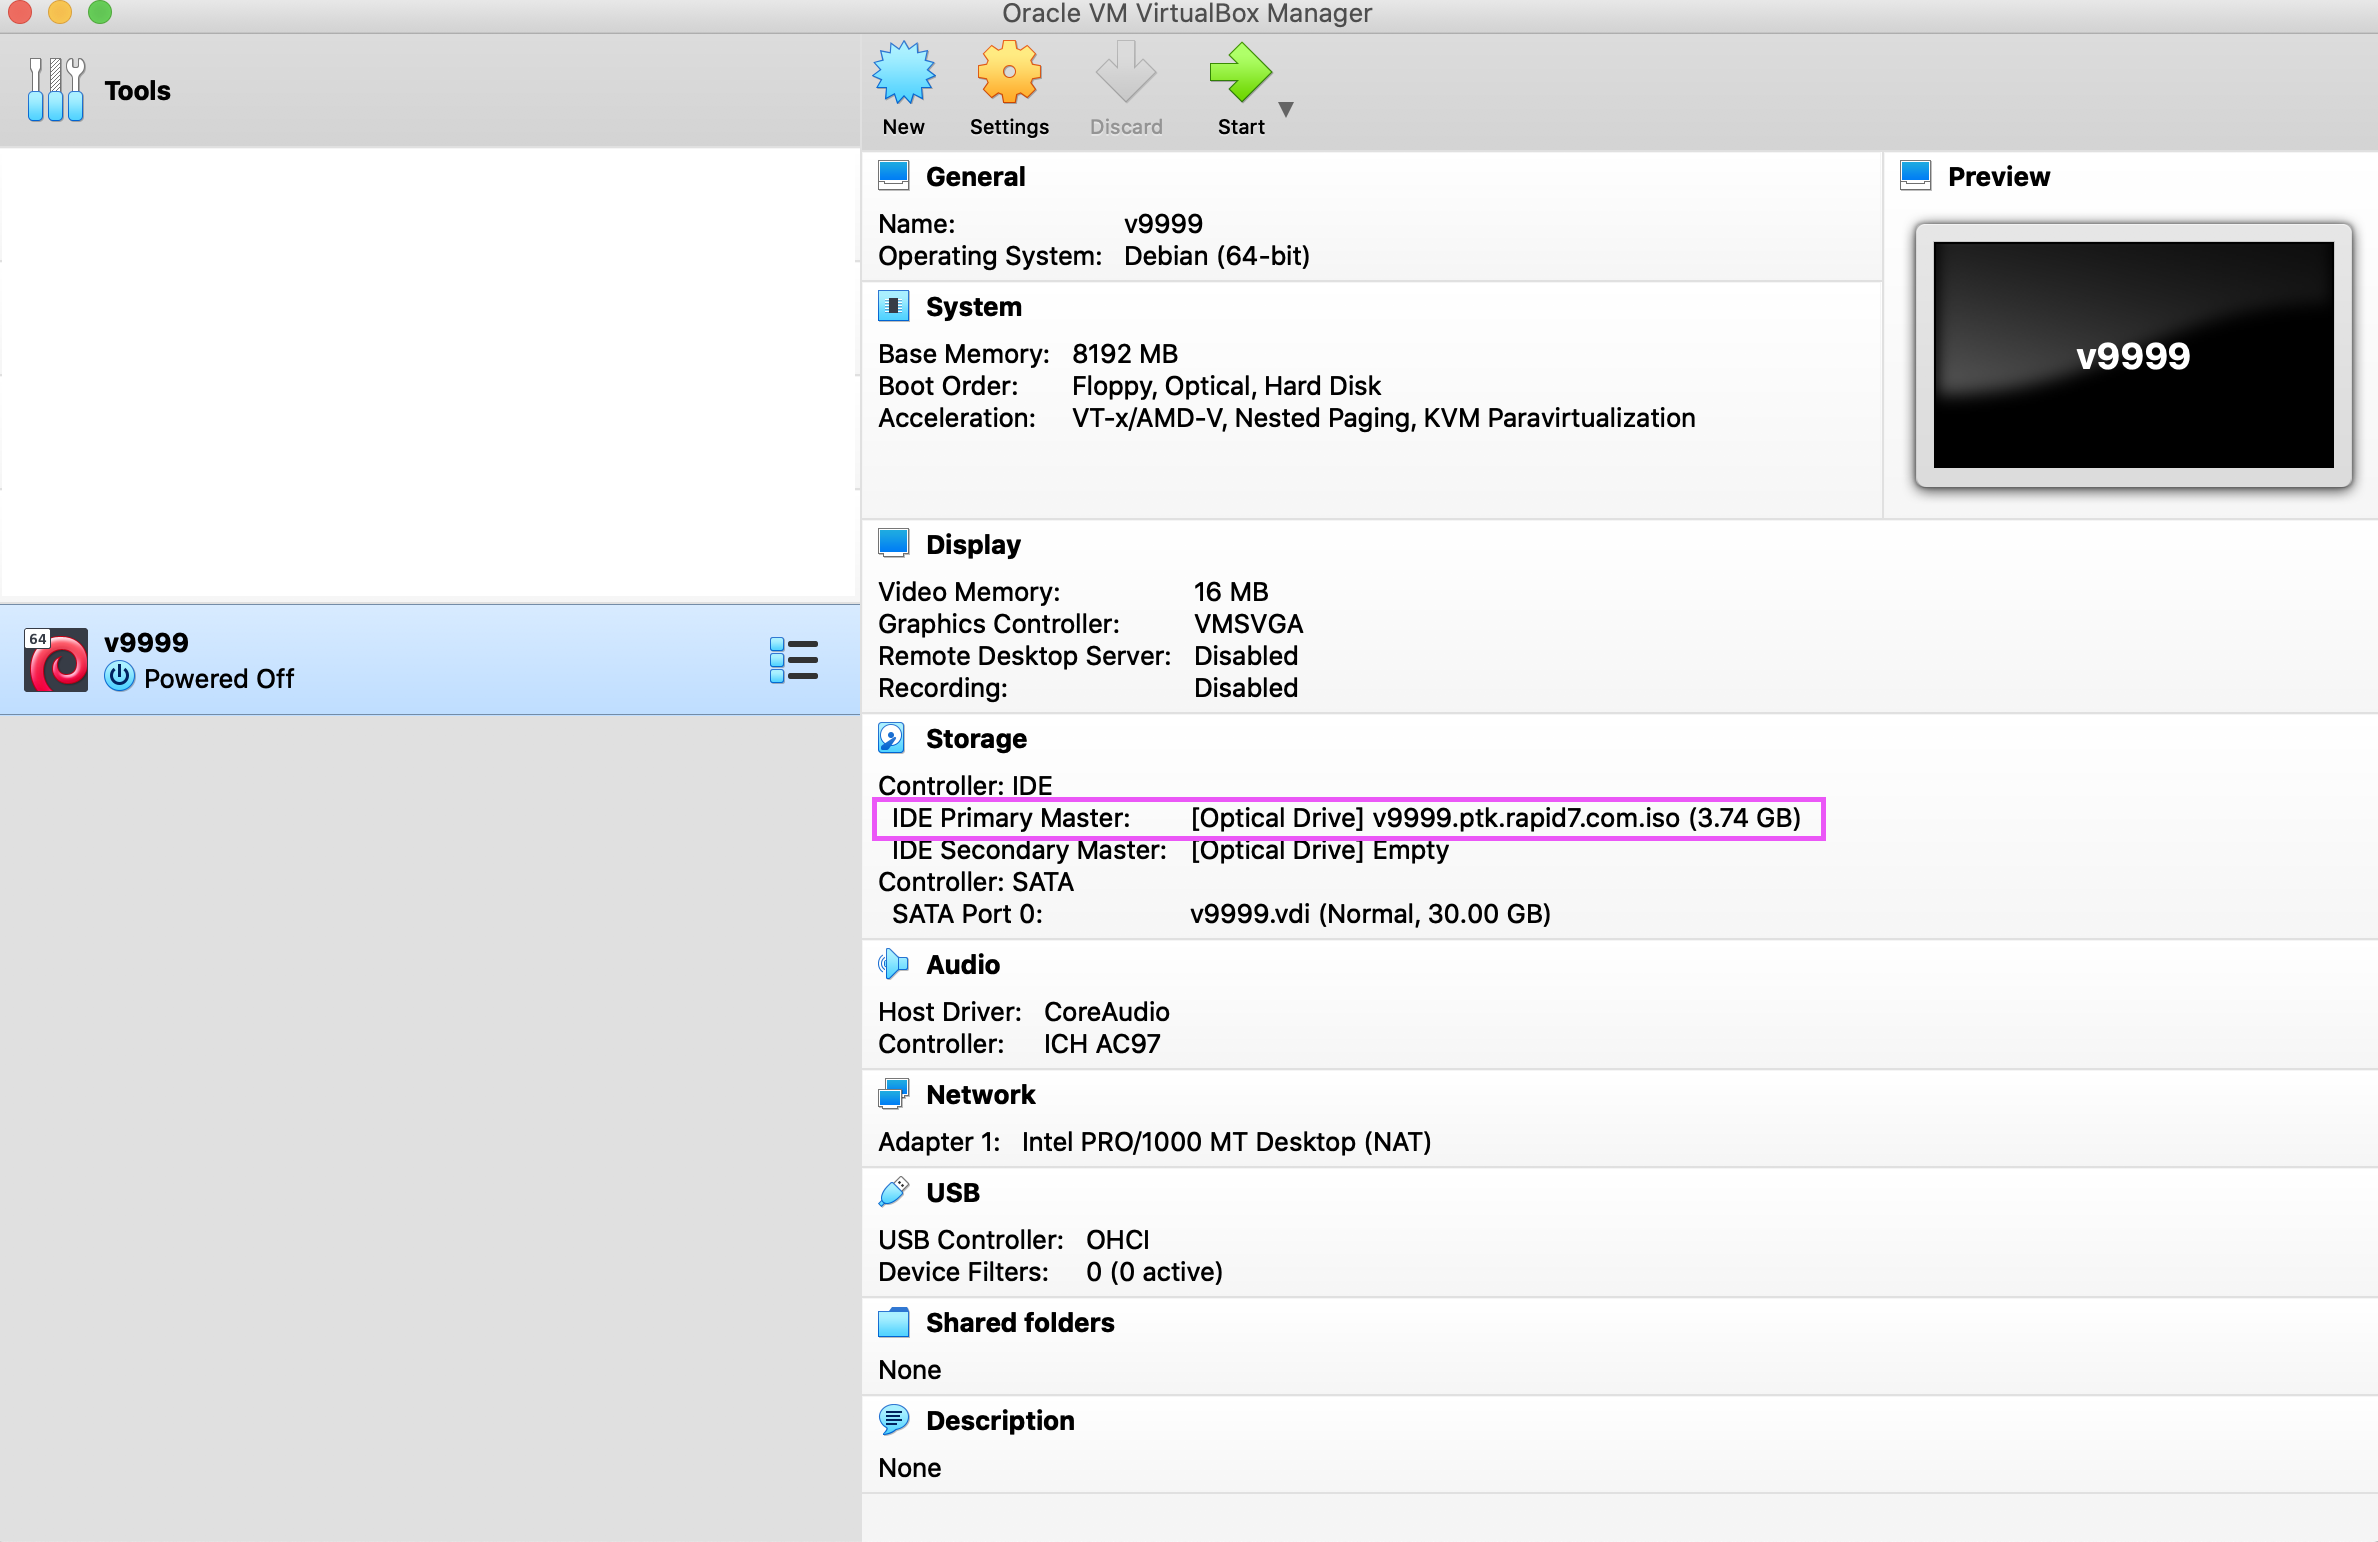
VirtualBox ISO Installation
-
After downloading the ISO, launch VirtualBox and click New.

-
Specify a Name and Folder for the VM. Choose Type: Linux and Version: Debian (64-bit). Click Continue.
-
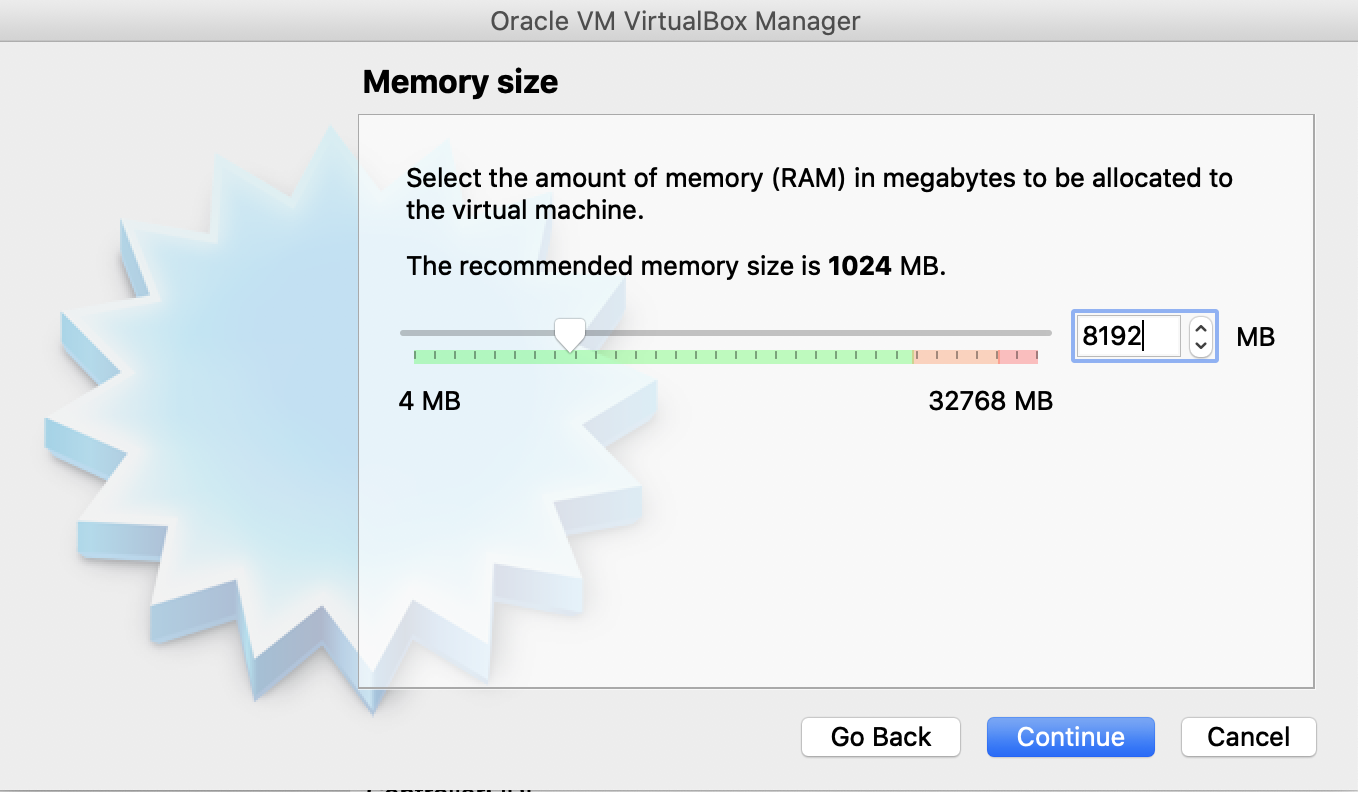
Specify 8192 MB for the Memory Size. Click Continue.
-
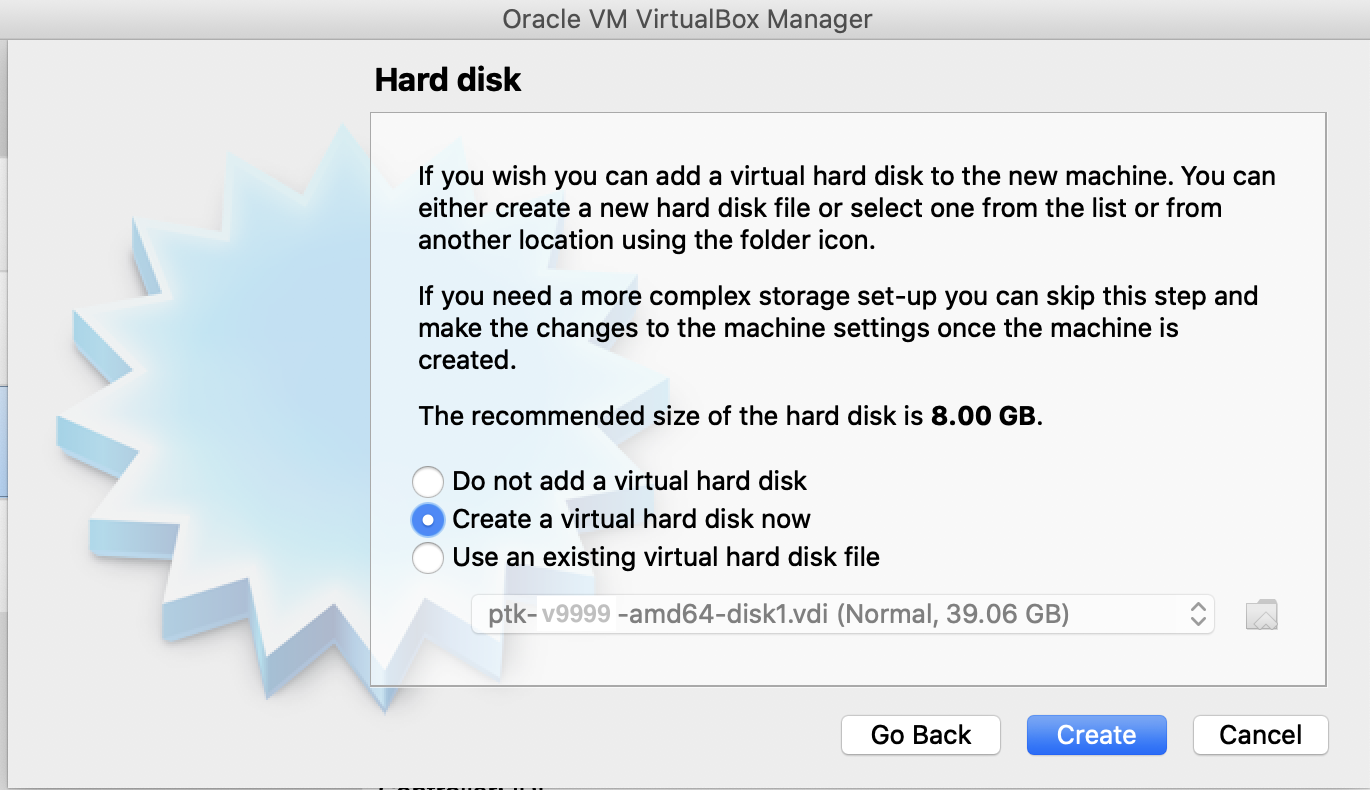
Select Create a virtual hard disk now. Click Create.
-
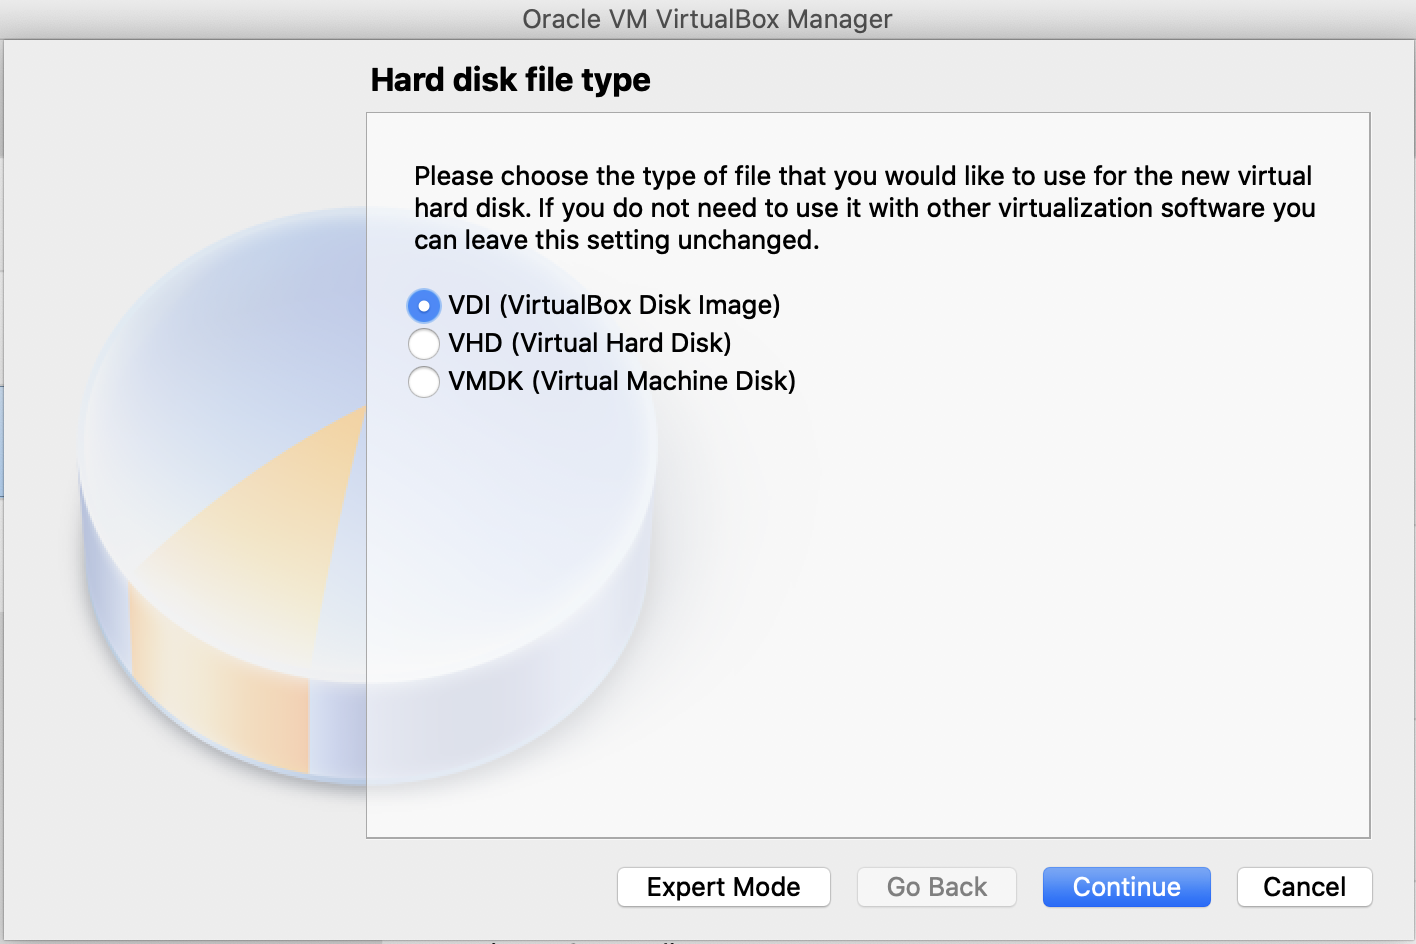
Select VDI (VirtualBox Disk Image). Click Continue.
-
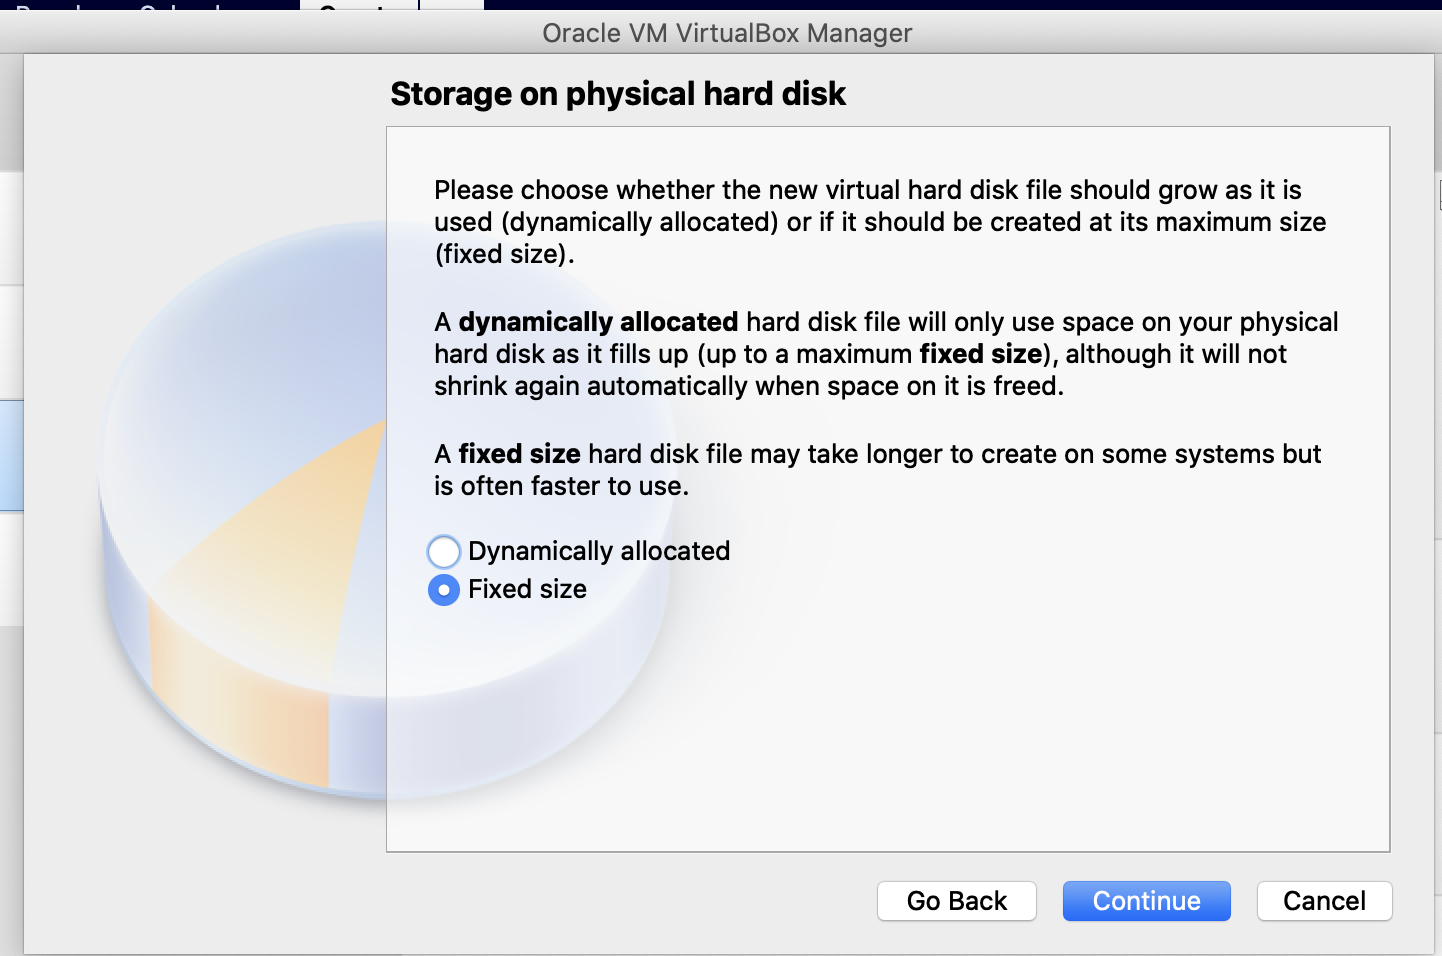
Select Fixed Size. Click Continue.
-
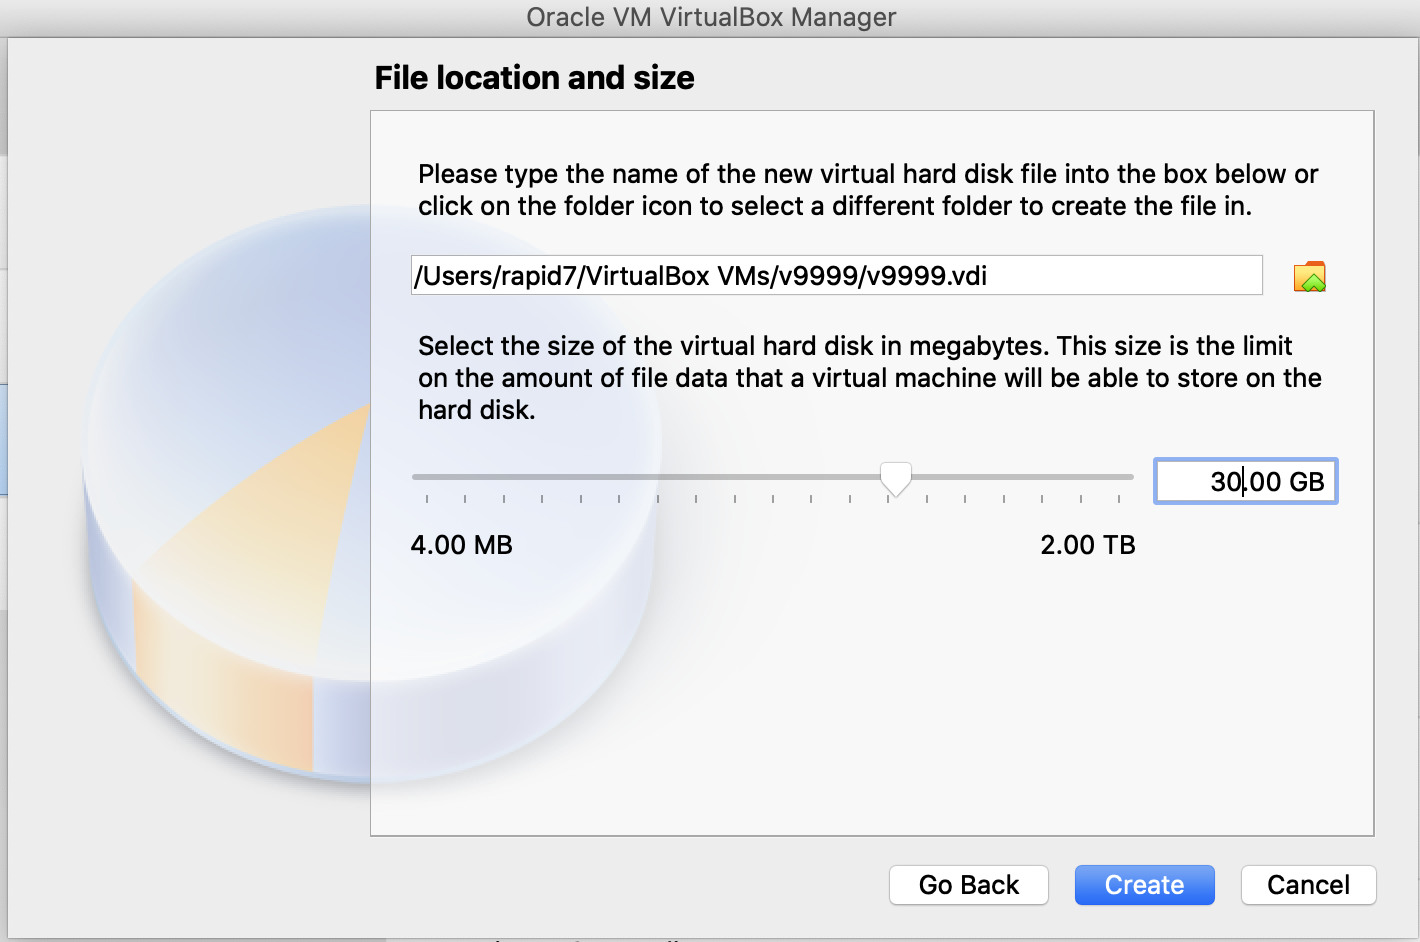
Specify 30GB for the size of the virtual hard disk. Click Create.
-
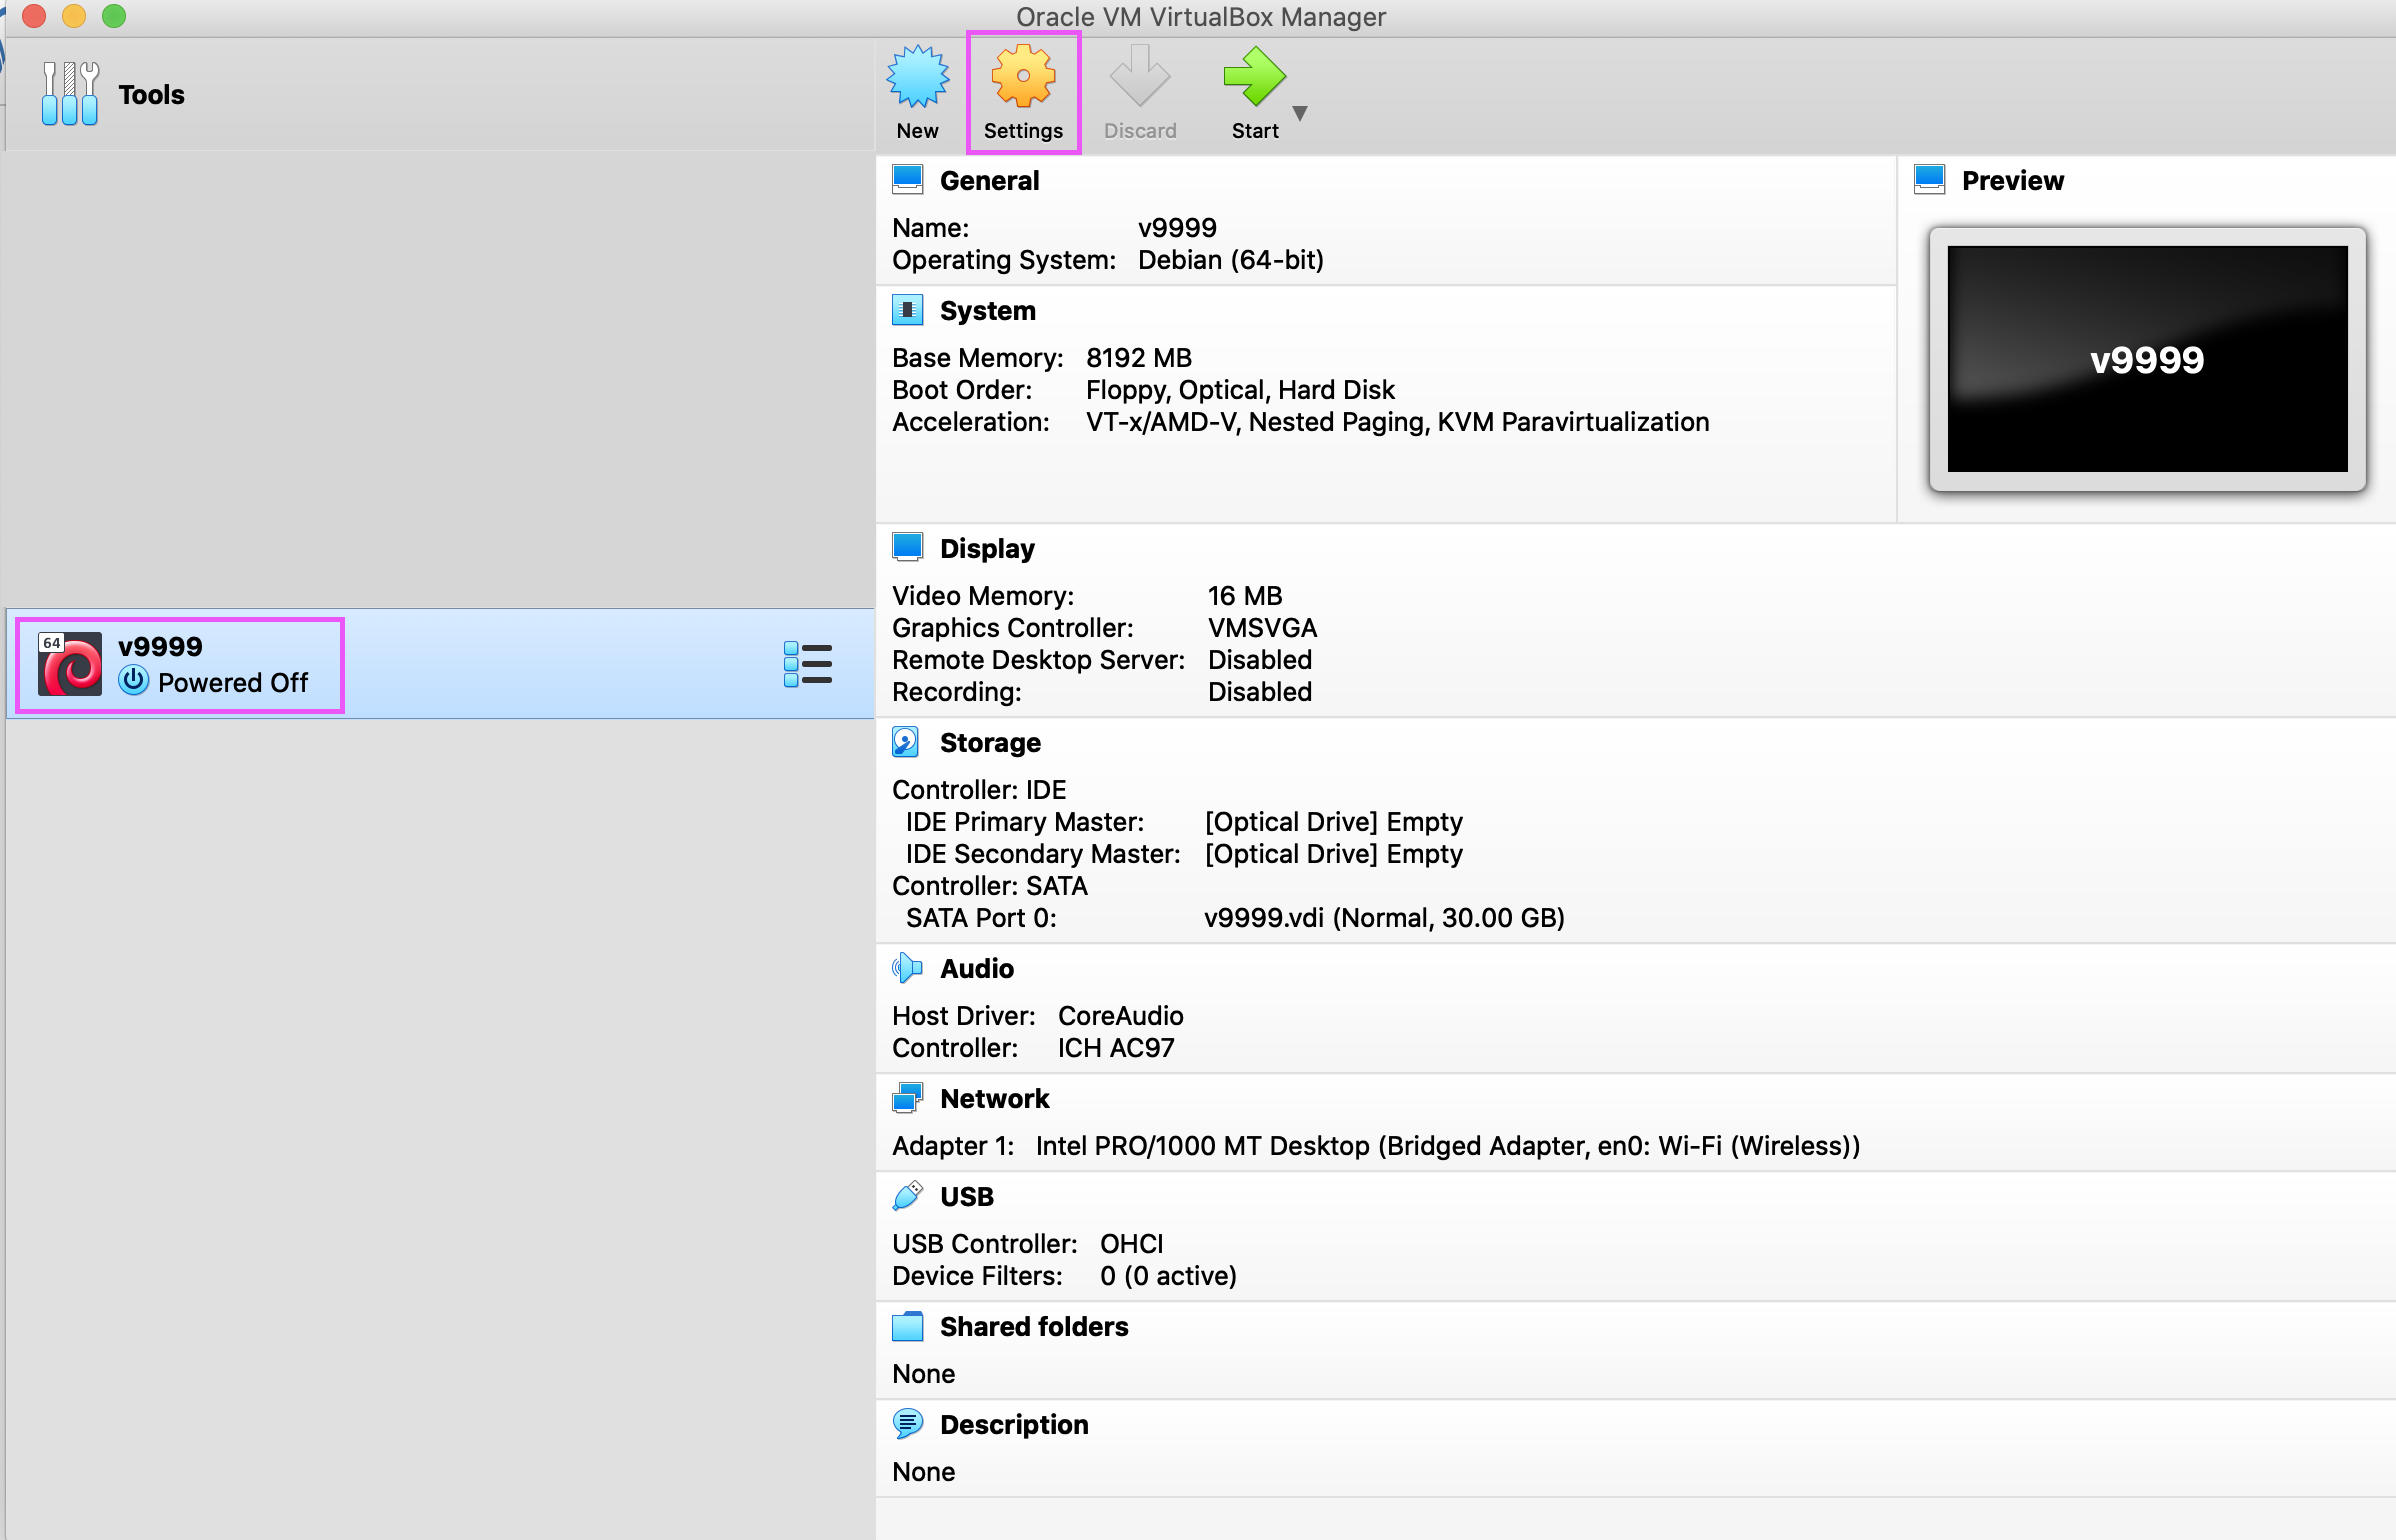
After the wizard closes, choose the VM in the list, and click Settings.
-
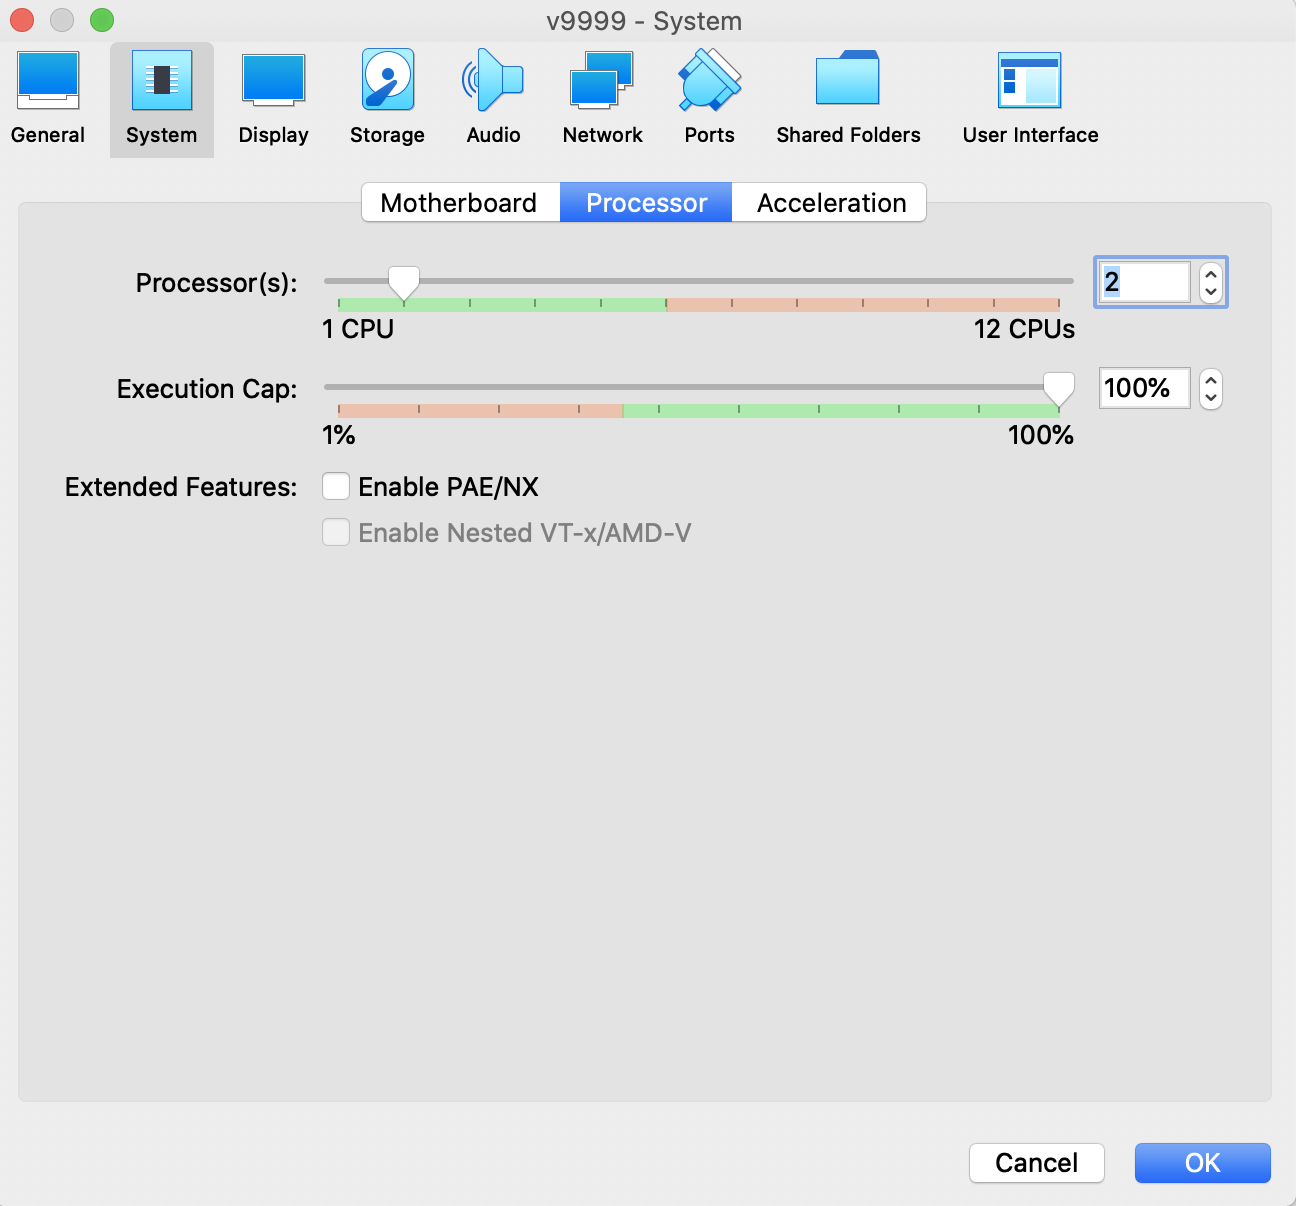
Choose System > Processor and specify 2 Processors.
-
Choose Network > Adapter 1. Select the Bridged Adapter:
-
Choose Storage and click the CD button to Add an optical drive.
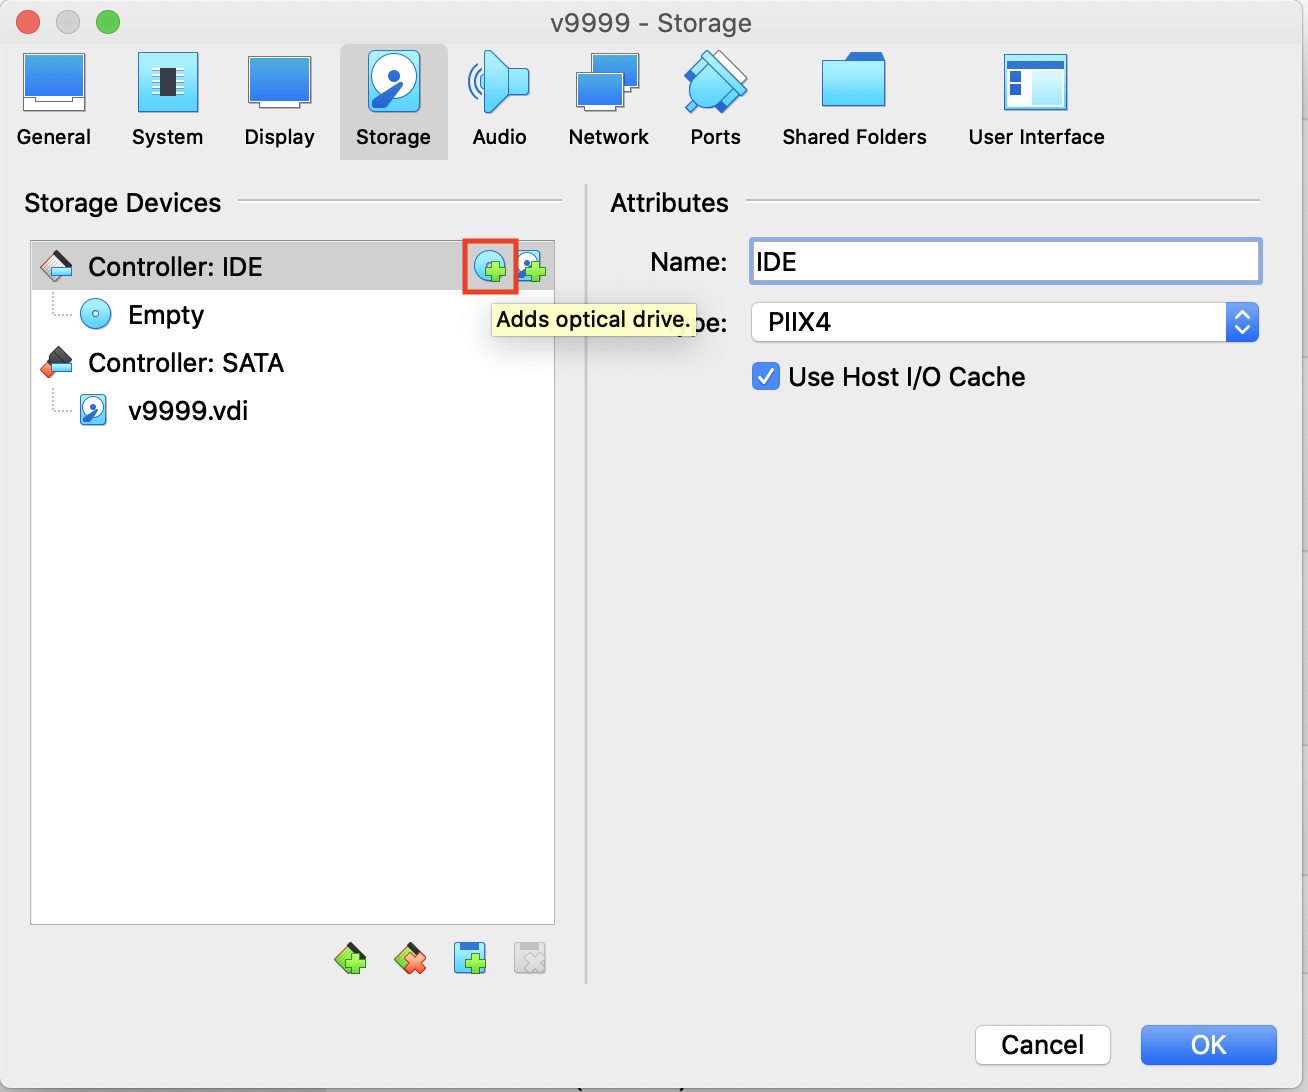
-
Click the Add button, and browse to the ISO file.
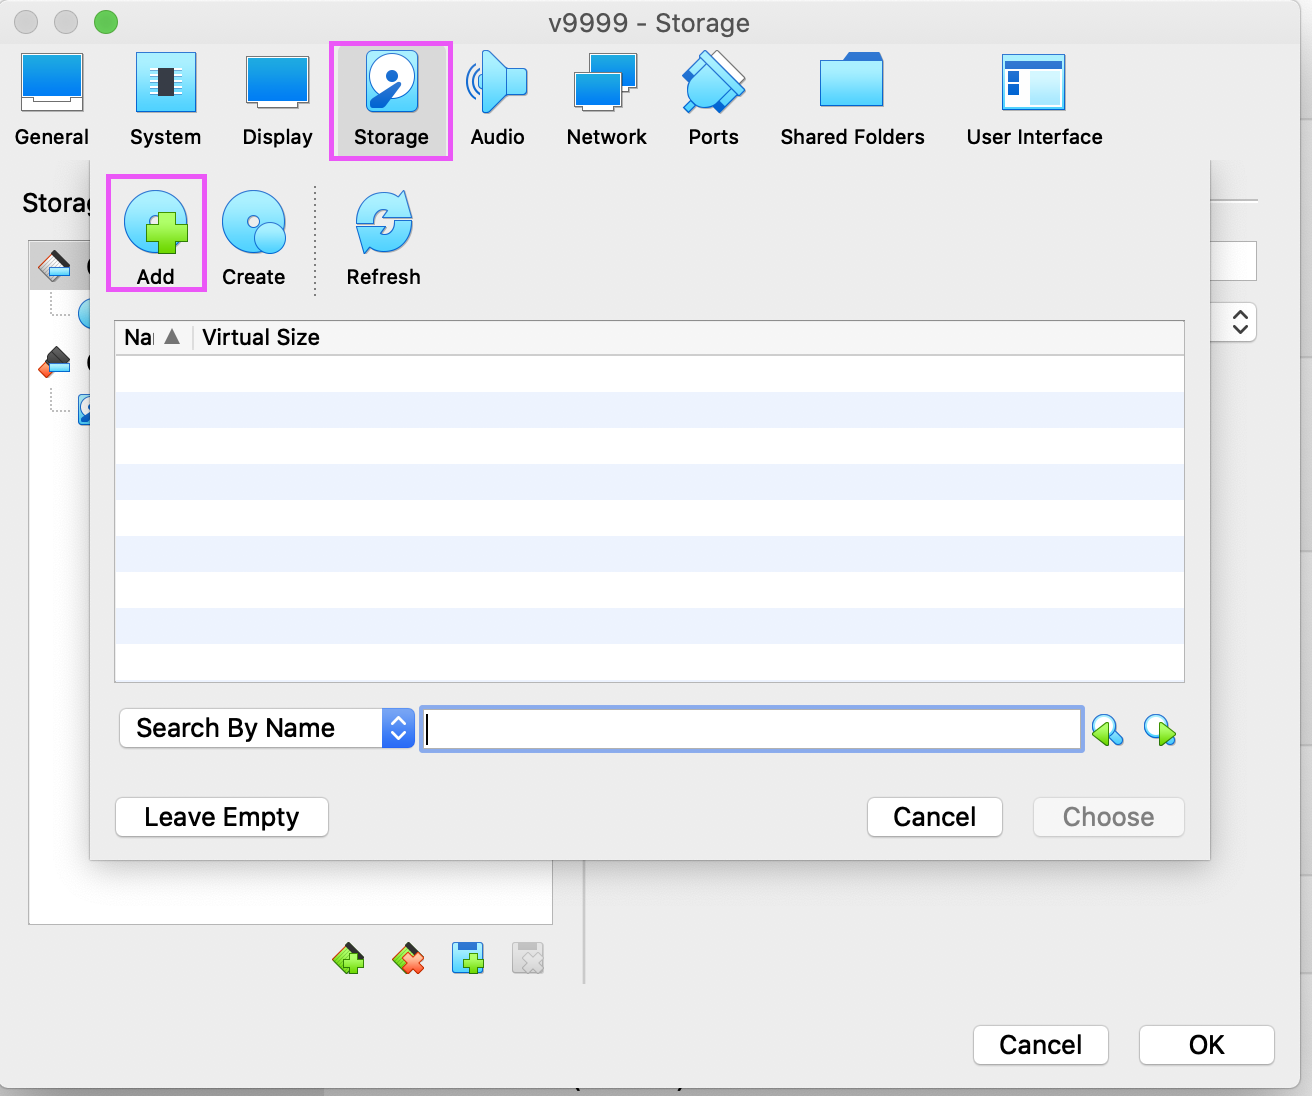
-
Select the ISO file and click Choose.
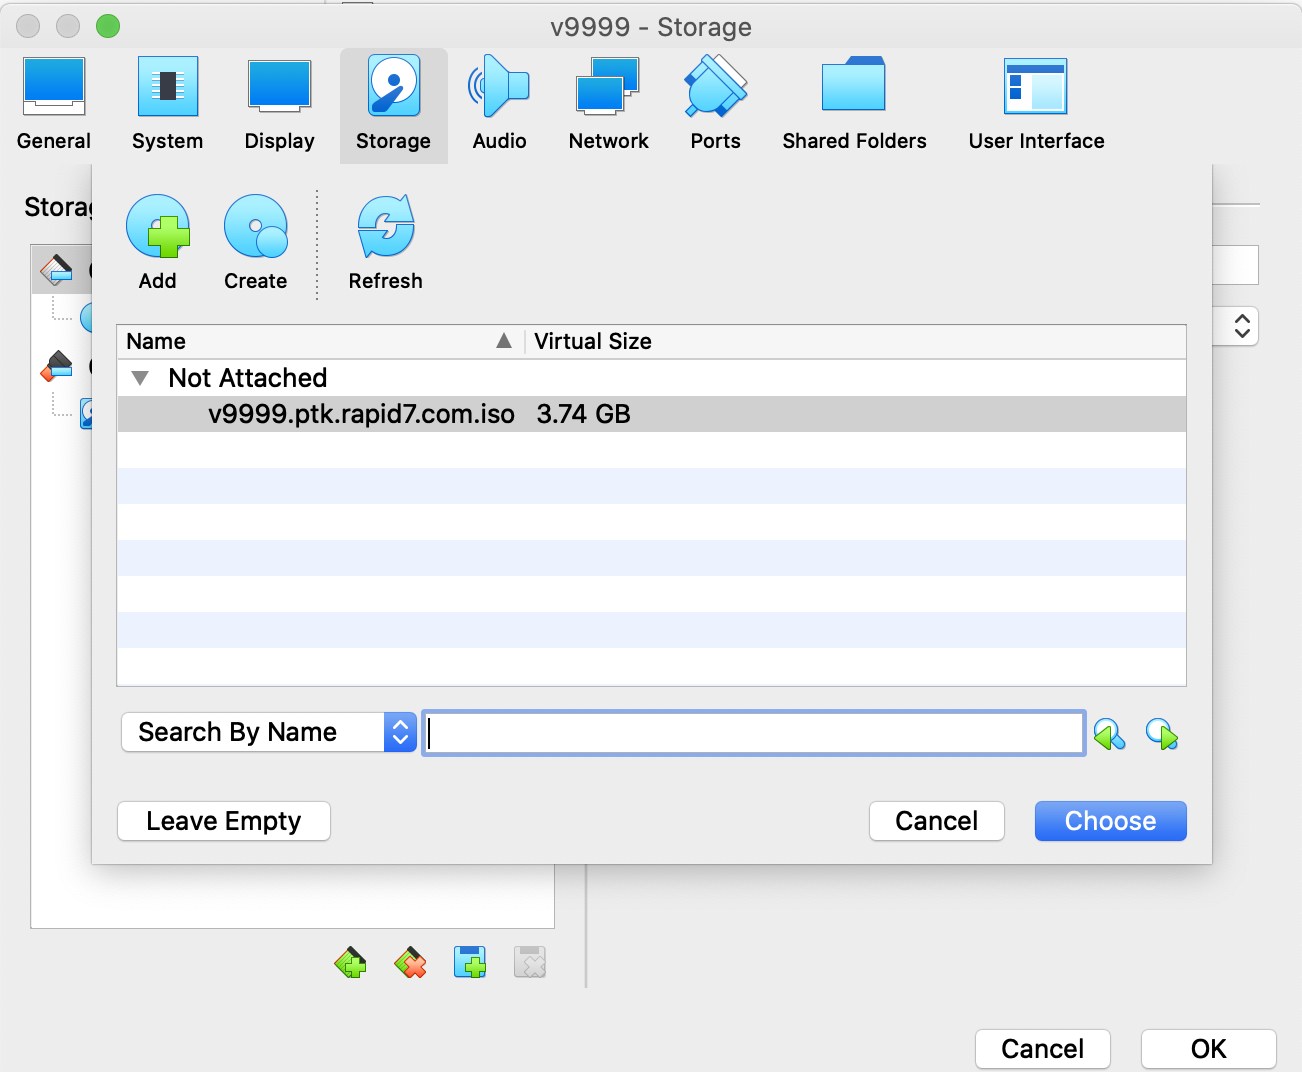
-
You should see the ISO in the Storage Devices list now. Click OK.
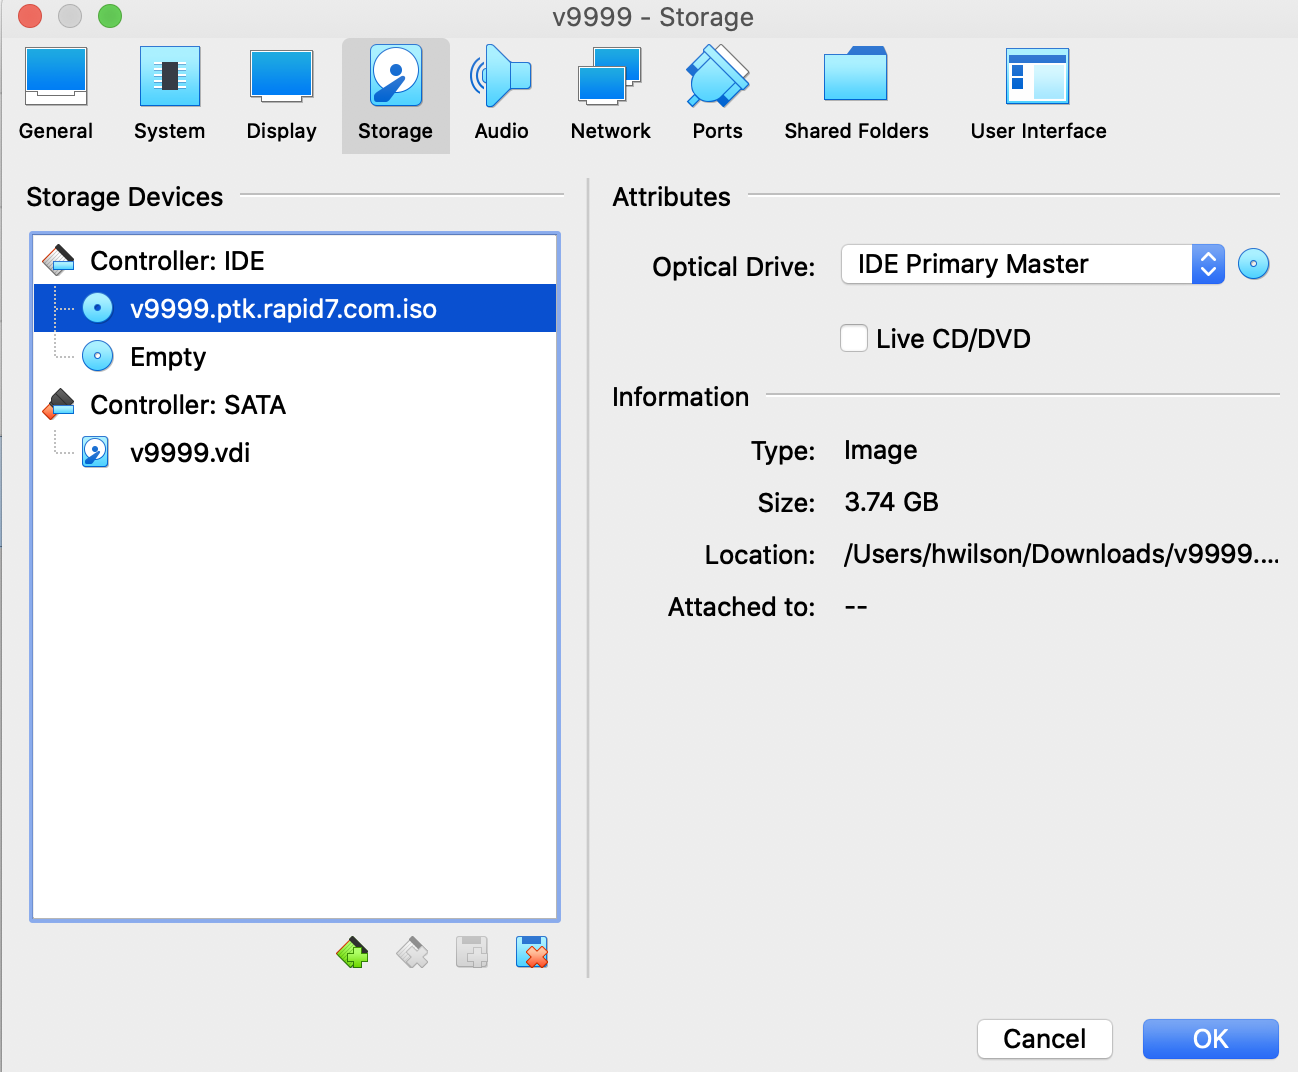
-
Once you confirm the ISO is in the Storage section, click Start. The VM should boot off of the ISO image and installation should continue without intervention:
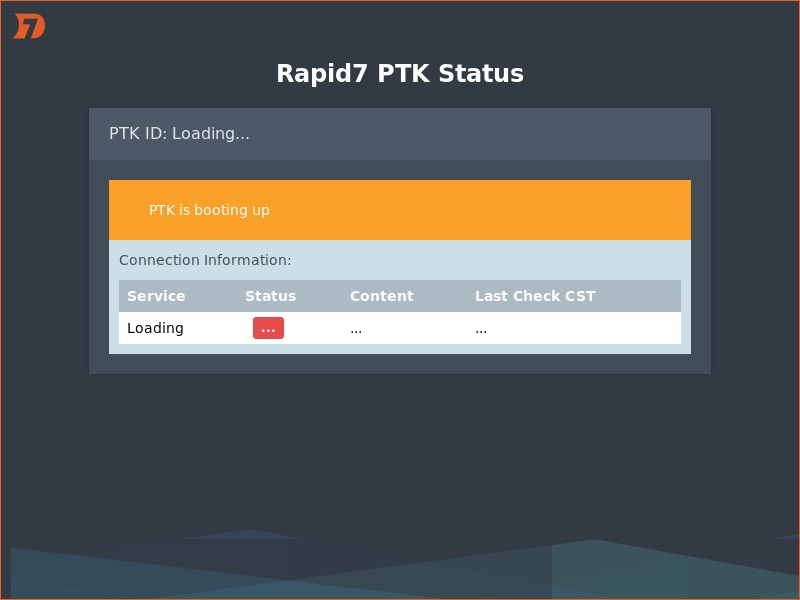
Post-Install
Once the PTK has been successfully installed and has booted up, you will see the following screen while the PTK is synchronizing with the Rapid7 VPN server:
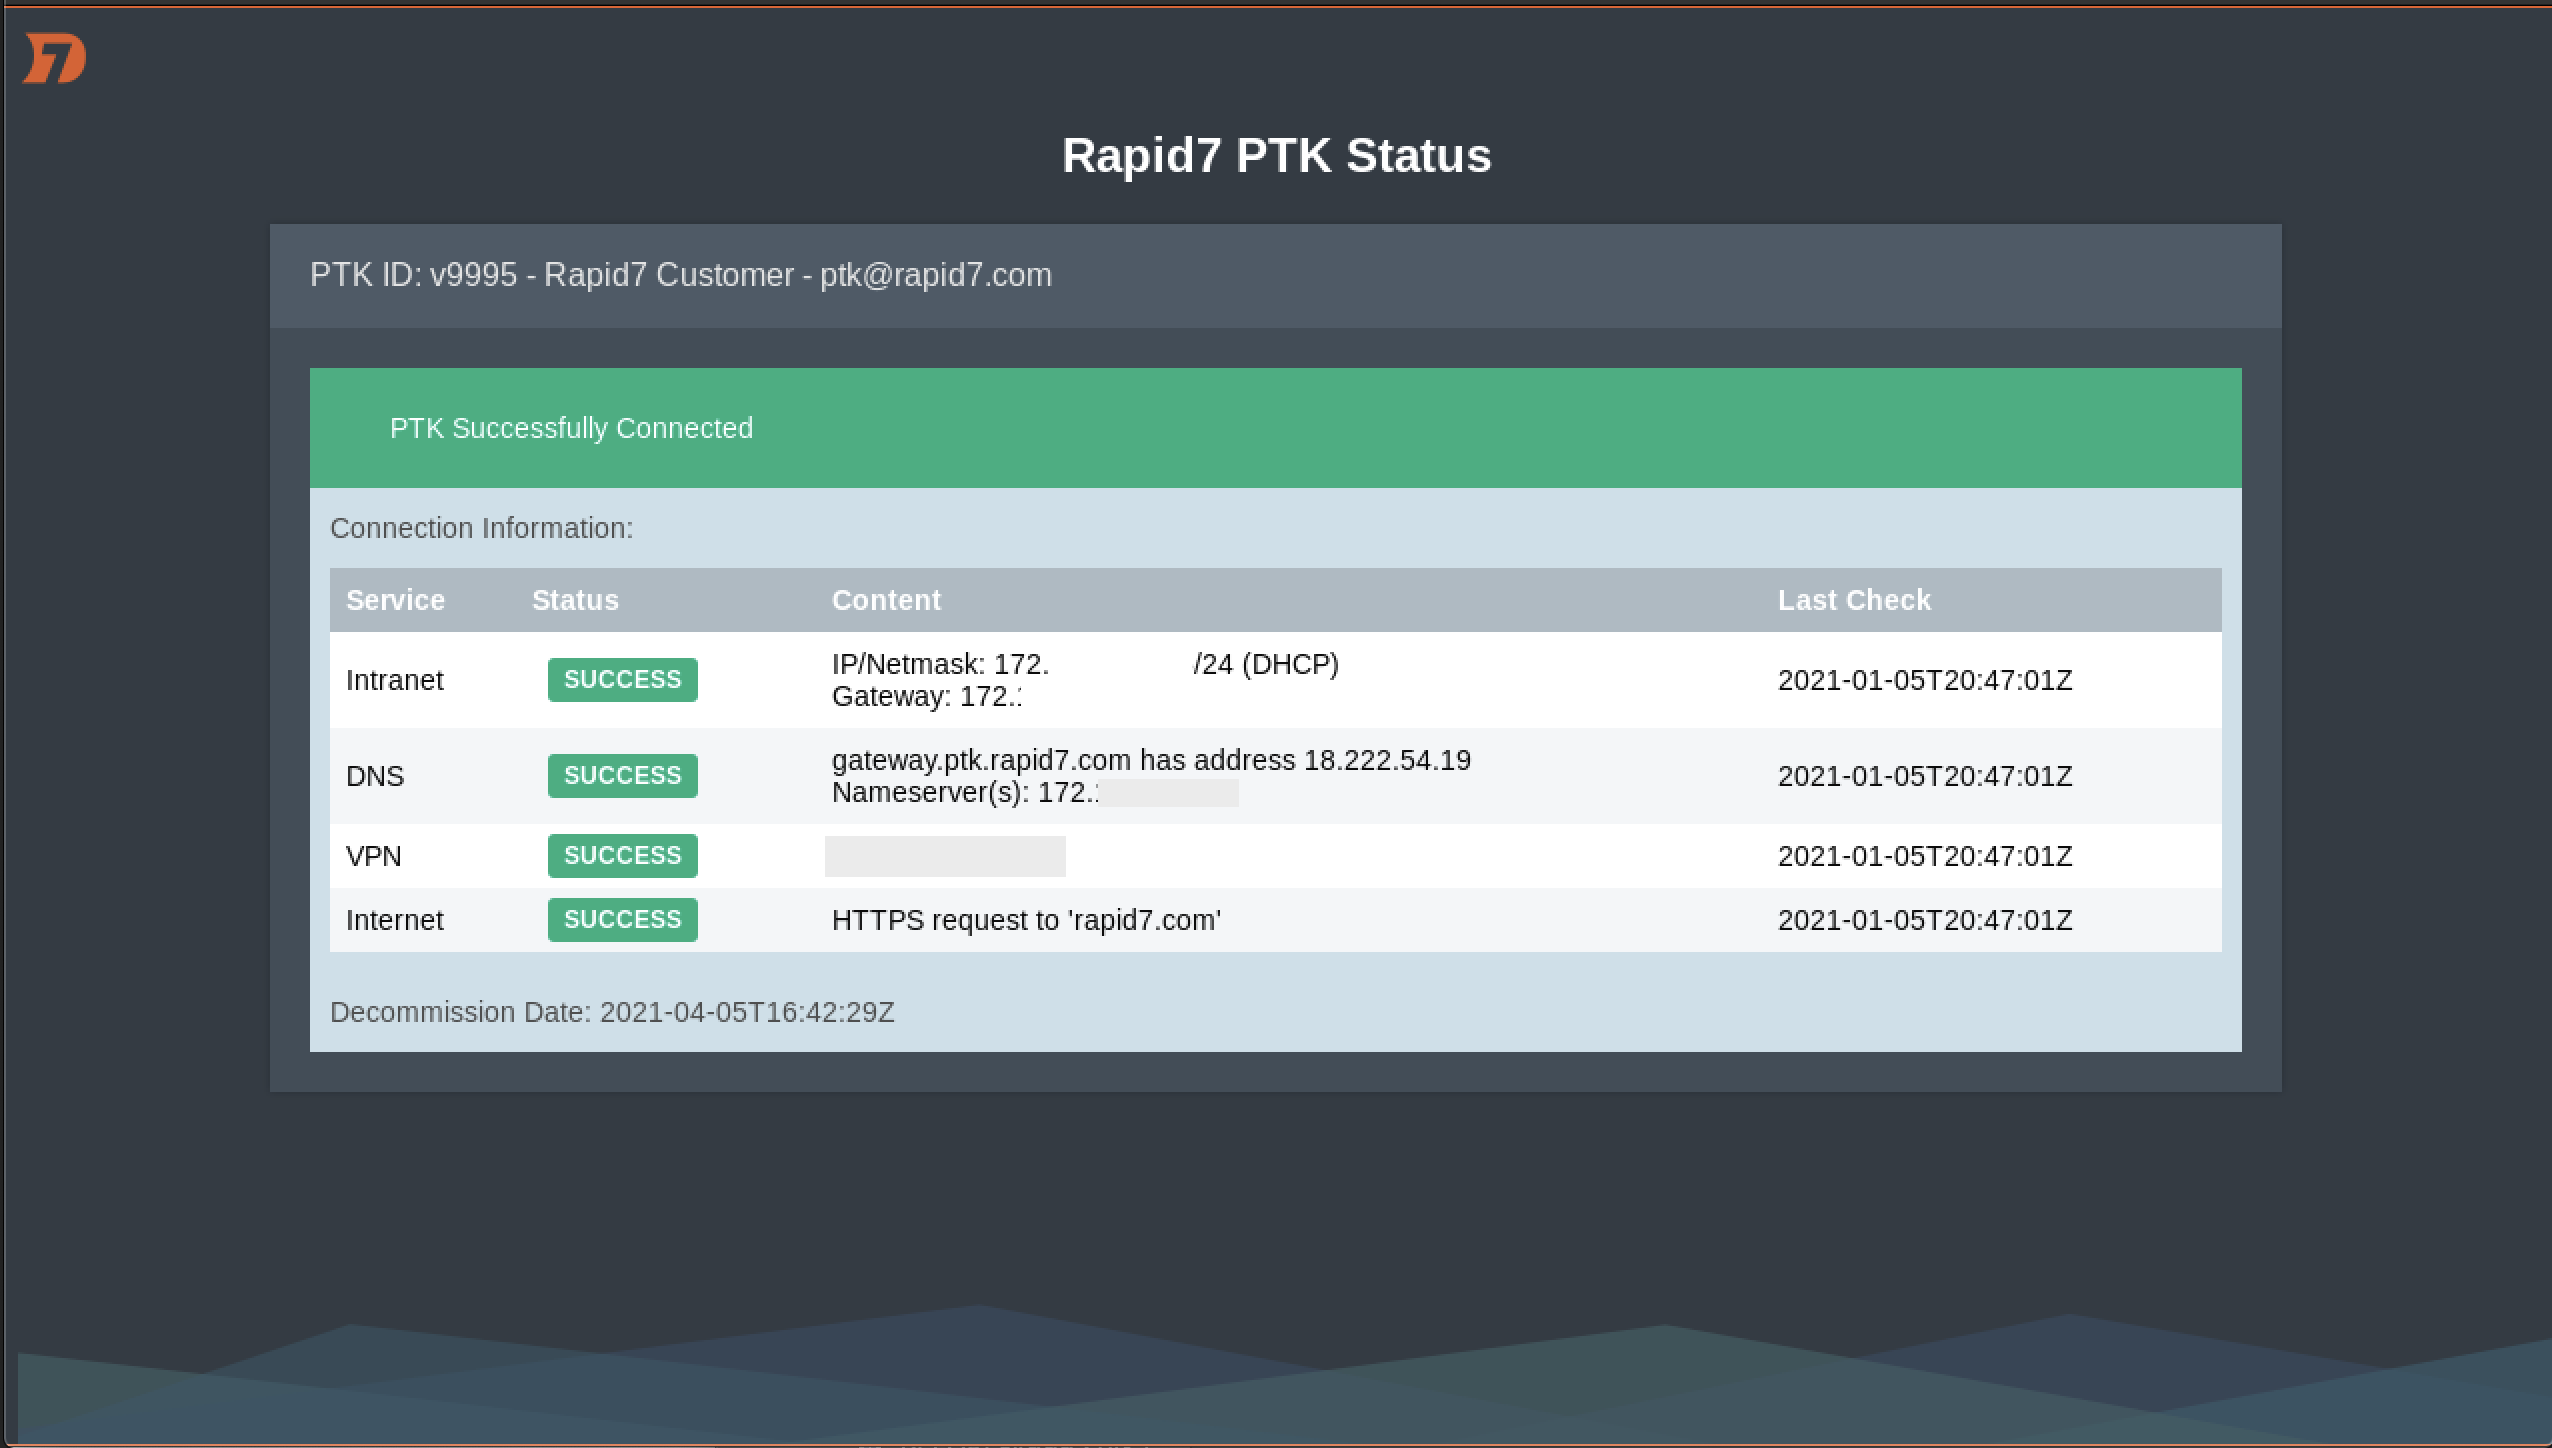
When the PTK has finished joining the PTK Network, you will see the following status screen indicating a successful connection:
If you do not see the above message or any of the status lines show an error, please see the troubleshooting page.
Reconfigure Networking
By default, the PTK will be configured to use DHCP. The PTK has an Alt+r hotkey which will allow you to reconfigure the network settings.
DHCP to Static reconfiguration
-
From the kiosk, press the
Alt+rhotkey to expose the Reconfiguring PTK Settings wizard.
-
Type
staticand hit the Enter key.
-
Type the IPv4 address for the PTK and hit the Enter key.

-
Type the Netmask for the PTK and hit the Enter key.

-
Type the default Gateway for the PTK and hit the Enter key.

-
Type the IP address of a DNS Server for the PTK and hit the Enter key.

-
At this point networking will restart. Hit the Enter key to close the wizard. Within five minutes the networking configuration should be completely refreshed on the kiosk screen.
Static to DHCP reconfiguration
-
From the kiosk, press the
Alt+rhotkey to expose the Reconfiguring PTK Settings wizard.
-
Hit the Enter key to accept the default answer of
dhcpOR typedhcpand hit the Enter key.
-
At this point networking will restart. Hit the Enter key to close the wizard. Within five minutes the networking configuration should be completely refreshed on the kiosk screen.
Troubleshooting
Job for networking.service failed at the end of wizard
The following error sometimes appears at the end of the Reconfiguring PTK Settings! wizard, but it is usually benign. However, if after five minutes the kiosk does not reflect the input you specified in the wizard, please try restarting the PTK.

Troubleshooting
While installation of the Rapid7 Penetration Testing Kit (PTK) is automated, issues sometimes arise that require additional debugging. This document exists to help our partners in understanding PTK behavior and common issues that might arise throughout the installation process. If your PTK displays an error on the status page, please refer to the following documentation before proceeding to contact the PTK support team.
PTK Installation Errors
- OVA Deployment Issues on VirtualBox
- OVF Package invalid
- Can't Acquire DHCP Lease
- Can't Access Debian Mirrors
- Disk Space Issues
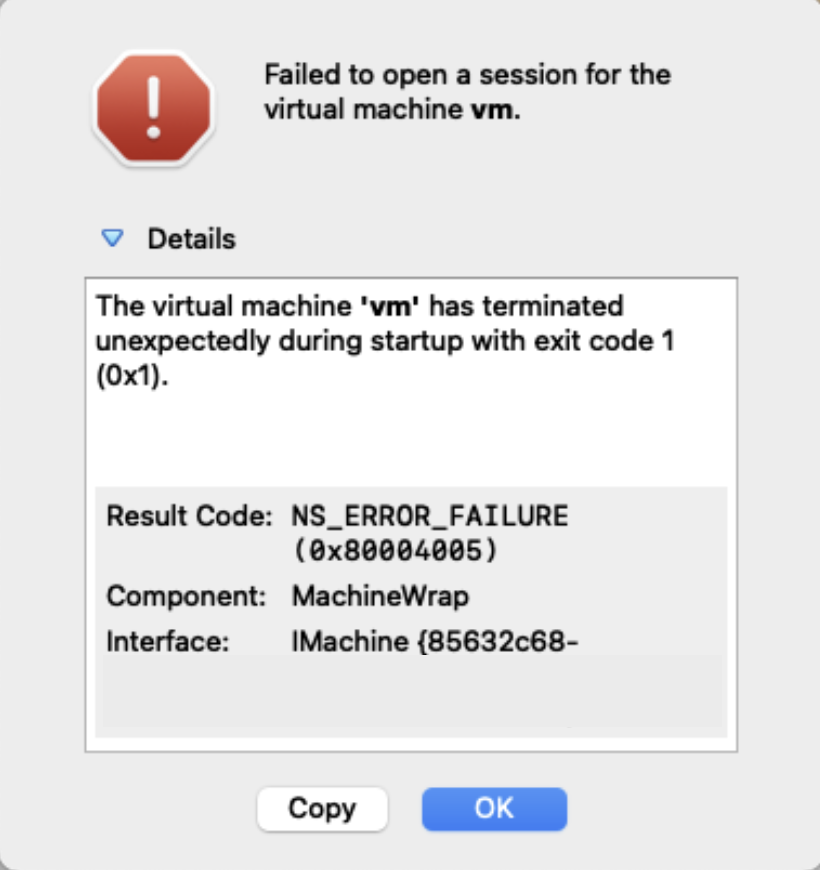
OVA Deployment Issues on VirtualBox
The OVA file is a bundled Virtual Machine that has been pre-configured with our Minimum Requirements. However, there are a couple of settings which it is important to confirm before Starting the OVA. The following issues may arise if you missed a step on the VirtualBox OVA Import page or if you don't meet the minimum requirements.
NS_ERROR_FAILURE : Failed to open a session for the virtual machine
If you see the following, you are likely running on an unsupported architecture such as ARM. Please refer to our Minimum Requirements.
Blinking cursor on Start
If you see the following when you Start the VM in VirtualBox, you likely missed the step specifying the Basic OS information in the Settings. Please refer to step #5 on VirtualBox OVA Import page.
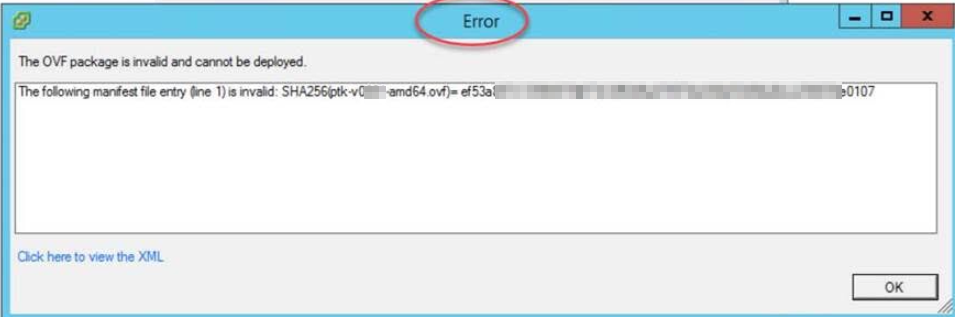
OVA Deployment Issues on VMware ESXi
The OVA file is a bundled Virtual Machine that has been pre-configured with our Minimum Requirements. Deploying an OVA is as simple as importing it into your selected virtualization platform and launching it.
Older versions of ESX do not support modern SHA256 signing of OVA files, which results in an "OVF package is invalid" error:
There is a workaround whereby the OVA can be re-signed using an algorithm that an older ESX supports. More information can be found at:
Can't Acquire DHCP Lease
If you are installing your PTK from the ISO, and it was configured to expect a DHCP server, and a DHCP lease cannot be acquired, you will encounter the following error during installation:

Hit Enter on your keyboard to select the default "<Continue>" option.
When asked how you would like to configure the network, select "Do not configure the network at this time" with your keyboard's arrow keys, and hit Enter:
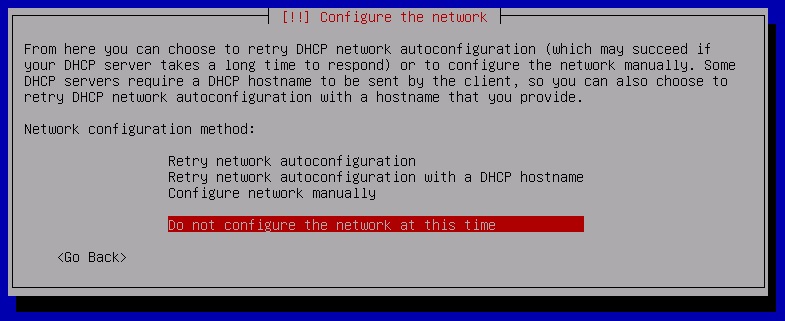
Rest assured that network connectivity is not required during PTK installation and can be easily reconfigured once the PTK has been fully deployed.
Can't Access Debian Mirrors
If you are installing your PTK from the ISO and the network the PTK is deployed into does not have direct Internet access, you may encounter an error that indicates the Debian archive mirrors could not be reached:

If this happens, skip past this stage of the installation by using your keyboard's arrow keys to select "<Go Back>" from the available options, and when prompted select "<Yes>" to confirm that you want to continue without a network mirror:
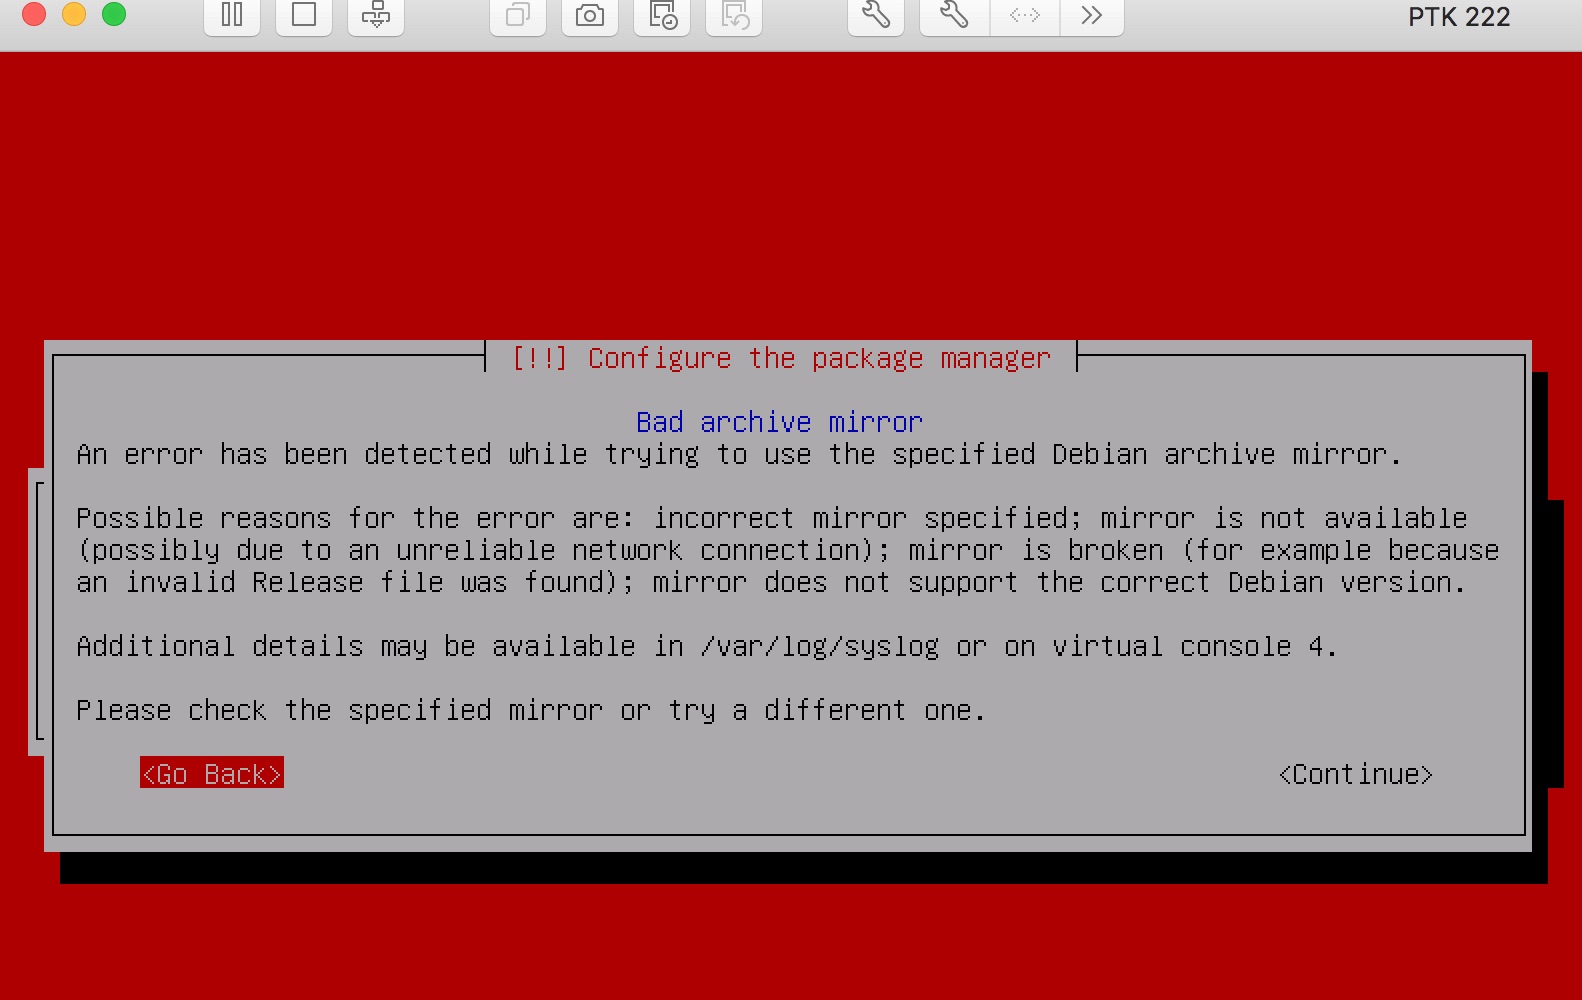

Installation will proceed and will complete normally.
Disk Space Issues
If you are installing your PTK from the ISO and the virtual HDD was configured with an insufficient amount of storage, you may receive an error stating "Installation step failed":

You will need to shut down the PTK VM, increase the capacity of the virtual HDD to match our minimum hardware requirements, and boot the PTK VM back up to start the installation process again.
Status Page Errors
If the PTK status page displays an error for any of these services, which is represented by a red status bar, we provide some troubleshooting steps for each of them. Please visit the following pages for specific debugging steps:
| Error | General Meaning |
|---|---|
| Intranet Error | The IP address information for static hosts is incorrect or the host did not properly recieve a DHCP response |
| DNS Error | The DNS lookup to the Rapid7 host did not finish properly, This generally indicates DNS blocks are in place preventing the lookup and proper response of gateway.ptk.rapid7.com |
| VPN Error | The VPN could not connect. This is generally caused by a firewall rule blocking the required ports or an application firewall blocking OpenVPN or TLS/SSL. Additionally, insure that any TLS/SSL intercepting proxies whitelist the PTK host |
| Internet Warning | The PTK could not make an HTTPS request to a Rapid7 resource. This generally indicates another form of application firewall rule |
When the PTK has finished joining the PTK Network, you should see the following status screen indicating a successful connection:
Intranet Error
If you are getting a FAIL state for the Intranet section of the PTK this is generally caused by the following:
- Network Access Control (NAC) or MAC Filtering
- DHCP Issues
- Invalid Static Configuration
NAC or MAC Filtering
If your organization implements a Network Access Control (NAC) solution or uses MAC address whitelisting, please ensure that the proper whitelists are created for the PTK.
DHCP Issues / Invalid Static Configuration
Ensure that the virtual machine is configured to recieve the same networking configuration as the environment it is deployed in. If the device does not have the correct networking configuration, please reconfigure the device by following the steps in the Reconfigure Networking section.
DNS Error
If the PTK displays an error for DNS lookups, this indicates that the network DNS is either being intercepted or is misconfigured. The PTKs conduct DNS A Record lookups to the gateway.ptk.rapid7.com host located at 18.222.54.19. If this is not the displayed IP address or the host lookup fails (ie returns NXRECORD), contact your networking team and ensure that a whitelist is put in place for the PTK host and the PTK subdomains.
Additionally, ensure that any domain categorizing network appliances allow accessing of the Rapid7 PTK hosts without a categorization block.
Custom DNS
If you would like to specify your own DNS, please reconfigure the device by following the steps in the Reconfigure Networking section.
VPN Error
If the PTK displays errors on the landing page after booting the most common issues are as follows:
- Application inspection
- TLS/SSL intercepting proxy
- Firewall rules blocked outbound
It is extremely common for the deployments to not recognize that next generation firewalls and application intercepting proxies are in place and preventing access. If your network is using Palo Alto and Fortinet firewalls please contact the team local to the PTK deployment and ensure that the firewall rules allow for outbound TLS/SSL and OpenVPN protocol connections. Additionally, please read the requirements page for details about specific ports and protocols.
Internet Warning
If the PTK is unable to connect to the internet, you will see an Orange WARNING. This is because Internet access is not required to perform assessments. This status is mostly used to help debug issues with the PTKs failing to connect to the VPN.
Outbound internet issues are difficult for the PTK team to debug as there can be many layers deployed between the PTK and the internet. The most common issues encountered that prevent direct internet access are:
- DNS categorization
- Application introspection
- Required outbound proxy
- Incorrect DHCP or static network configuration
DNS Categorization
If your network deploys a DNS categorization service, ensure that the gateway.ptk.rapid7.com infrastructure is whitelisted for the PTK. The exact categorization information will vary depending on the service deployed and there is no specific category that can be applied to allow the PTK access.
Application Introspection
Next generation firewalls and application inspecting proxies can often cause connectivity problems for the PTK devices. Rapid7 PTKs are required to have outbound allows for:
- TLS/SSL
- OpenVPN
Outbound Proxy
The current configuration does not allow for full tunneling over an outbound proxy; an exception for the PTK is required.
Incorrect Network Information
If the device does not have the correct networking configuration, please reconfigure the device by following the steps in the Reconfigure Networking section.
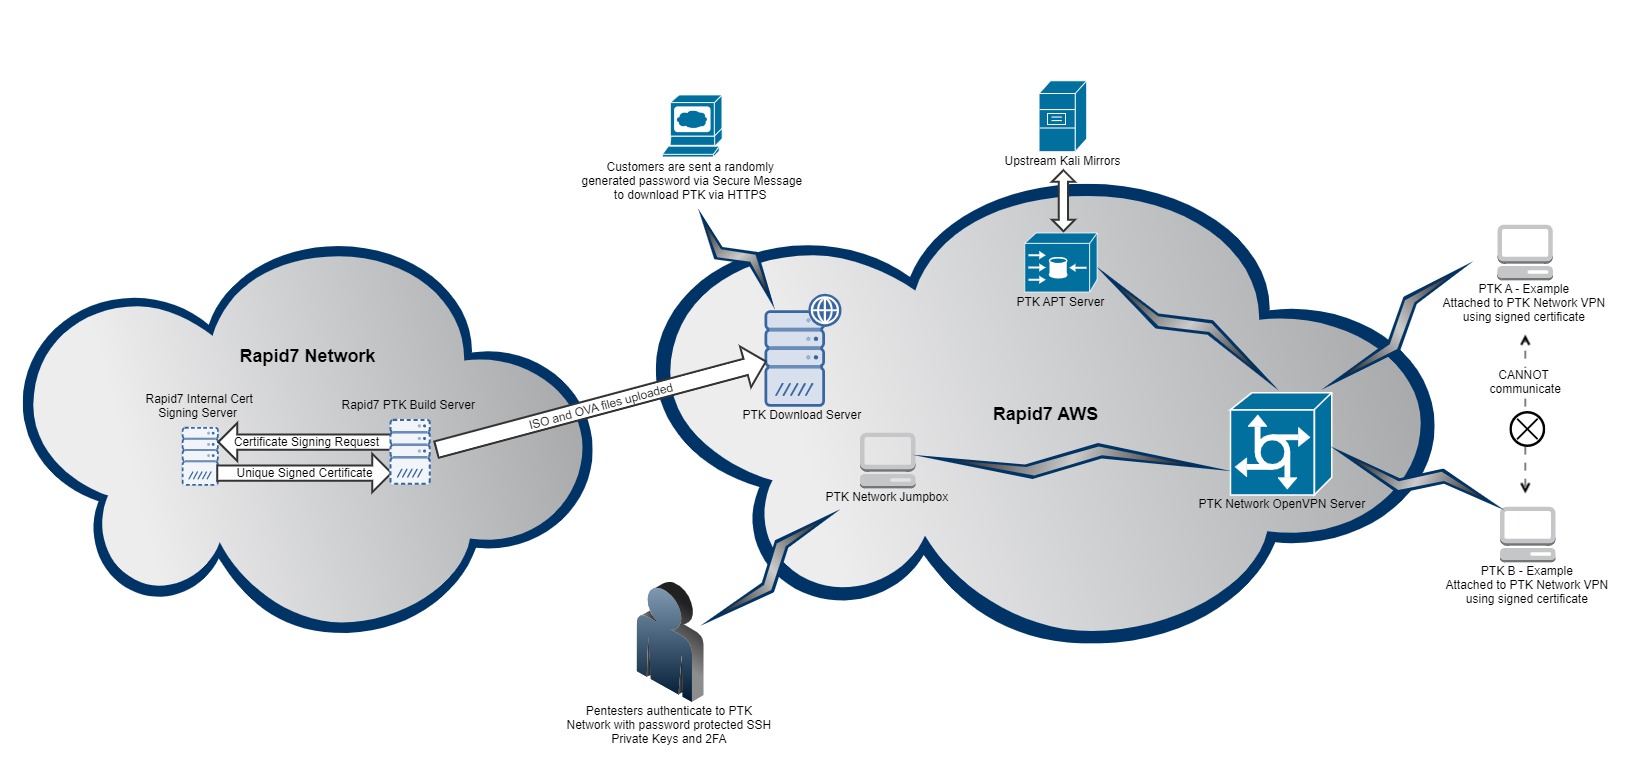
PTK Design Information
PTK Architecture
Rapid7's PTK infrastructure is designed to require minimal changes to outbound infrastructure and with a secure per-client deployment and configuration. The following image gives a high level summary of the architecture (Click here for a full sized image):
Kiosk Hotkeys
Rapid7 PTKs run in a "kiosk" mode using a privilege seperation design. The kiosk allows for a set of hotkeys that can be used to reconfigure the PTK or to gain access to underlying operating system shells. Rapid7 does not distribute the techsupport or root credentials to the PTKs:
Alt+r- Initiates a networking reconfiguration script. Allows clients to reconfigure DHCP or Static without direct SSH accessAlt+t- Executes a login prompt to the lower privilege techsupport user.Alt+Shift+Enter- Executes a login prompt as the root/tester user.